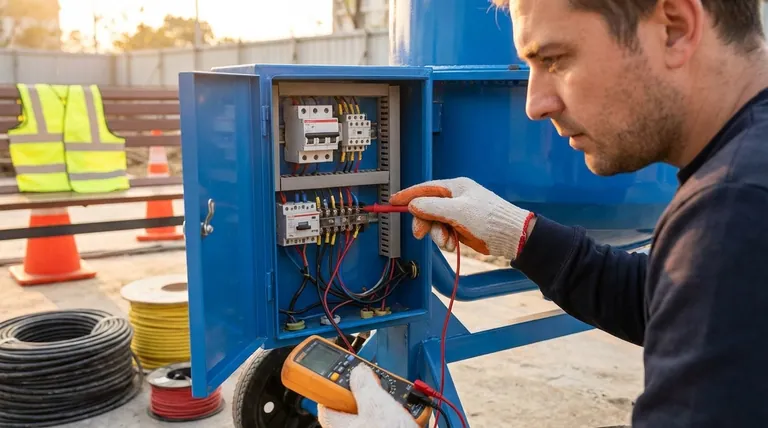
The most direct way to inspect a concrete mixer's electrical system is to first visually examine all wires, cables, and connectors for any signs of wear, exposure, or damage. You must also ensure all plugs are securely connected and that control buttons and switches are physically intact and functioning correctly.
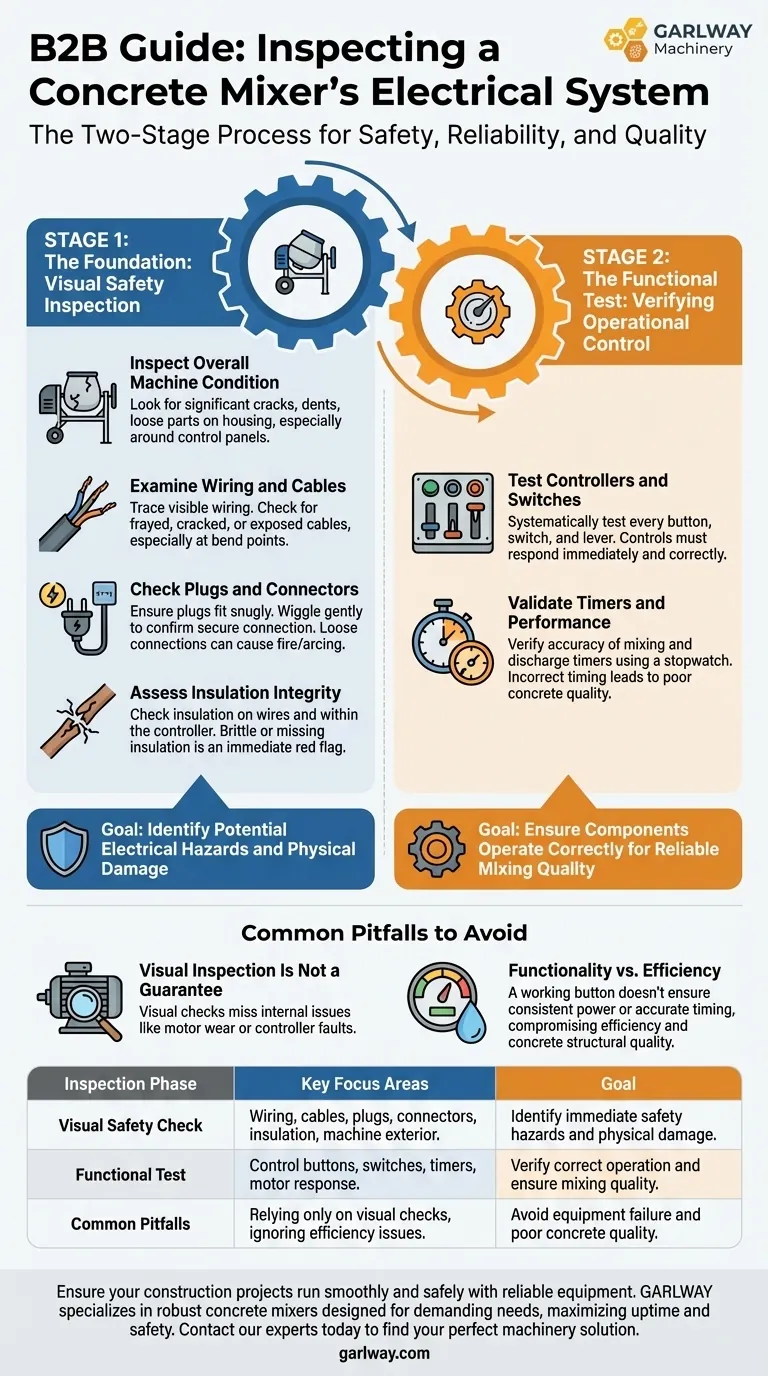
A proper electrical inspection is a two-stage process: first, a meticulous visual check to identify immediate safety hazards, followed by a functional test to confirm the system operates as intended.
The Foundation: A Visual Safety Inspection
Before powering on the equipment, a thorough visual inspection is the mandatory first step. This process is designed to identify potential electrical hazards that could lead to equipment failure or operator injury.
Inspecting Overall Machine Condition
A damaged exterior can signal underlying electrical problems. Look for any significant cracks, dents, or loose parts on the mixer's housing, particularly around control panels or motor enclosures, as these can compromise the protection of internal wiring.
Examining Wiring and Cables
Trace the path of all visible electrical wiring. You are looking for any cables that are frayed, cracked, or have exposed copper wire. Pay special attention to areas where cables bend or may come into contact with moving parts.
Checking Plugs and Connectors
All electrical plugs must fit snugly into their outlets. Wiggle each connection gently to ensure it is secure. A loose connection can cause arcing, which is a serious fire and electrical hazard.
Assessing Insulation Integrity
The protective insulation on wires and within the controller is critical. Any sign of brittle, cracked, or missing insulation is an immediate red flag that requires professional repair before the machine is used.
The Functional Test: Verifying Operational Control
Once you've confirmed the system is visually safe, you can proceed with a functional test. This phase ensures the electrical components are not just safe, but are also performing their jobs correctly to produce a quality concrete mix.
Testing Controllers and Switches
With the machine safely powered on, systematically test every button, switch, and lever on the control panel. Each control should respond immediately and perform its designated function without hesitation or error.
Validating Timers and Performance
If your mixer has automated functions, use a stopwatch to verify the accuracy of the mixing and discharge timers. Incorrect timing, controlled by the electrical system, can lead to poor concrete homogeneity and inconsistent batches. This test connects electrical function directly to output quality.
Common Pitfalls to Avoid
A comprehensive inspection goes beyond a simple checklist. Understanding the limitations of a visual check and the deeper implications of electrical function is what separates routine maintenance from true quality assurance.
Visual Inspection Is Not a Guarantee
A wire can appear perfectly intact while the motor it powers is failing internally. A visual check mitigates obvious external risks but does not diagnose issues like motor wear or internal controller faults.
Functionality vs. Efficiency
Confirming a button "works" is only half the battle. If the electrical system delivers inconsistent power to the motor or if timers are inaccurate, the mixer may function but will operate inefficiently. This can compromise the structural quality of the concrete itself by failing to properly mix aggregates and cement paste.
How to Apply This to Your Inspection
Your inspection priorities will shift slightly depending on your role and goal. Use this as your guide.
- If your primary focus is daily operator safety: Your main priority is the visual inspection for exposed wires, damaged plugs, and secure connections before every use.
- If your primary focus is periodic maintenance: You must perform both the visual inspection and a thorough functional test of all controllers and timers to ensure operational reliability and output quality.
Ultimately, a diligent electrical inspection is the foundation for a safe, reliable, and effective concrete mixing operation.
Summary Table:
| Inspection Phase | Key Focus Areas | Goal |
|---|---|---|
| Visual Safety Check | Wiring, cables, plugs, connectors, insulation, machine exterior | Identify immediate safety hazards and physical damage |
| Functional Test | Control buttons, switches, timers, motor response | Verify correct operation and ensure mixing quality |
| Common Pitfalls | Relying only on visual checks, ignoring efficiency issues | Avoid equipment failure and poor concrete quality |
Ensure your construction projects run smoothly and safely with reliable equipment. GARLWAY specializes in construction machinery, offering durable concrete mixers, winches, and batching plants designed for the demanding needs of construction companies and contractors globally. Our machines are built with robust electrical systems to maximize uptime and safety. Contact our experts today to find the perfect machinery solution for your operational needs and enhance your site's efficiency and safety.
Visual Guide
Related Products
- Portable Concrete Mixer Machine Equipment for Mixing Concrete
- Construction Products Concrete Plant Machine Mixing Concrete Mixer
- Portable Electric Concrete Mixer Machine for Cement Mixing
- Concrete Cement Mixer Machine Drum Mixer for Construction
- HZS90 Large Multiquip Concrete Mixers for Construction
People Also Ask
- How much does a portable concrete mixer hold? A Guide to Choosing the Right Capacity
- What are the benefits of portable concrete mixers? Achieve On-Site Mixing Flexibility & Control
- What are the advantages of a portable concrete mixer? Boost Efficiency & Save Costs on Small Jobs
- What types of portable concrete mixers exist? Find the Perfect Mixer for Your Project
- How much concrete can you pour with a portable mixer? Find the Perfect Fit for Your Project


