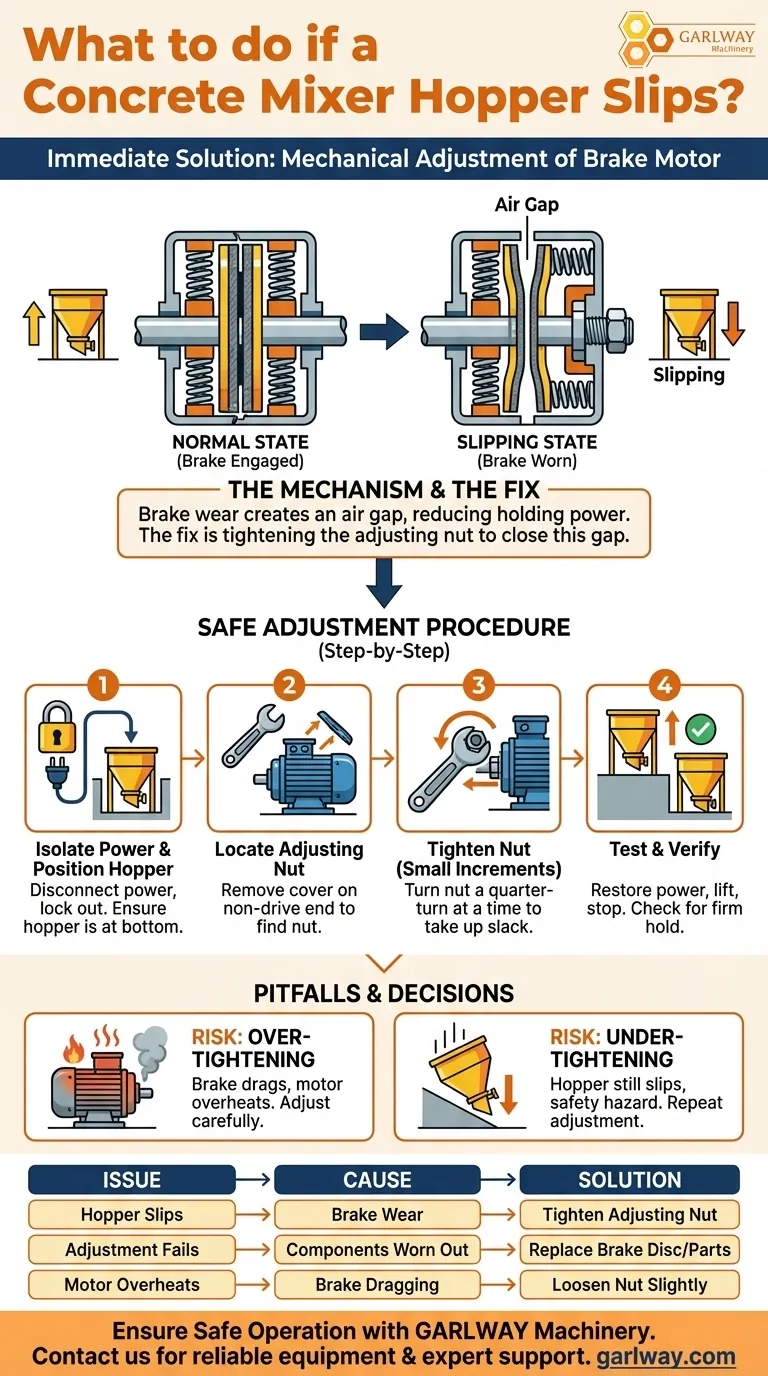
When the hopper of a concrete mixer slips, the immediate solution is a mechanical adjustment of the brake motor. This involves safely lowering the hopper to the bottom of its pit and then tightening the large adjusting nut on the brake motor assembly. This process compensates for brake wear and restores the necessary holding power.
The core issue is not a failure of the lifting motor, but rather the natural wear of the integrated brake system designed to hold the hopper's weight. The fix is a straightforward mechanical adjustment to close the gap created by this wear, ensuring the brake can engage effectively again.
Understanding the Mechanism: Why Hoppers Slip
To confidently fix a slipping hopper, it's essential to understand the components involved. The problem originates with the brake that is part of the main winch motor assembly.
The Role of the Brake Motor
The motor that lifts the hopper is equipped with an integrated, spring-applied electromagnetic brake. When power is sent to the motor to lift the hopper, an electromagnet disengages this brake.
When power is cut, the electromagnet releases, and strong springs instantly clamp the brake shut, securely holding the hopper in any position.
How Brake Wear Causes Slipping
Like the brake pads on a car, the friction surfaces inside the motor brake wear down over time with repeated use. This wear creates a small air gap between the brake components.
If this gap becomes too large, the springs cannot apply enough clamping force to overcome the weight of a loaded hopper, causing it to slip downwards when stopped.
The Function of the Adjusting Nut
The large nut mentioned in the repair procedure is the mechanism designed to compensate for this wear.
Tightening this nut manually closes the air gap, moving the braking surfaces closer together. This restores the spring's ability to apply the full, required force to hold the hopper securely.
The Safe Adjustment Procedure
Follow these steps methodically to ensure a safe and effective repair. Safety must be the top priority.
Critical First Step: Isolate Power
Before performing any mechanical work, completely disconnect and lock out the power to the concrete mixer. This prevents any possibility of the motor engaging unexpectedly while you are working on it.
Step 1: Position the Hopper
Ensure the hopper is resting securely at the very bottom of its travel pit. This removes all tension from the winch cable and eliminates the risk of the hopper falling during the adjustment process.
Step 2: Locate the Adjusting Nut
The brake assembly is typically located on the non-drive end of the motor, often protected by a metal cover or fan cowl. Remove this cover to access the large adjusting nut and the brake mechanism.
Step 3: Perform the Adjustment
Using the appropriate tools, tighten the large nut. This should not be done aggressively. Turn it in small increments—perhaps a quarter-turn at a time. The goal is only to take up the slack created by wear.
Step 4: Test and Verify
After a small adjustment, temporarily restore power to the mixer. Lift the hopper a few feet off the ground and then stop it.
Observe carefully. If it holds firm with no slippage, the adjustment is successful. If it still slips, repeat the power-down and adjustment process with another small increment.
Common Pitfalls and Risks to Avoid
A correct adjustment restores safety, but an incorrect adjustment can create new problems. Understanding the balance is key.
The Risk of Over-Tightening
If the adjusting nut is tightened too much, the brake will not be able to fully disengage when the motor is powered.
This causes the brake to "drag," leading to rapid overheating of the motor, excessive wear on the brake components, and inefficient operation.
The Risk of Under-Tightening
Failing to tighten the nut sufficiently means the original problem is not solved. The hopper will remain a significant safety hazard, with the potential to slip or fall, especially when fully loaded.
Knowing When Adjustment Isn't Enough
Adjustment is a solution for normal operational wear. However, the brake friction material is a finite resource. If the adjusting nut has been tightened to its limit and the hopper still slips, the brake discs are likely worn beyond their service life and must be replaced.
Making the Right Choice for Your Goal
Proper brake maintenance is fundamental to the safe operation of any skip-fed concrete mixer. Use these principles to guide your actions.
- If your primary focus is routine maintenance: Proactively test the brake by stopping a loaded hopper mid-lift and check for any drift or slippage before it becomes a noticeable problem.
- If you are responding to a known slip: Immediately take the equipment out of service and perform the full, safe adjustment procedure detailed above.
- If the adjustment provides no improvement: Recognize this as a sign that the brake components are fully worn and schedule a complete replacement of the brake disc and related parts.
Proper brake adjustment is not just a repair; it is a critical safety practice that ensures reliable and secure operation of your equipment.
Summary Table:
| Issue | Root Cause | Solution |
|---|---|---|
| Hopper slips when stopped | Wear on the brake motor's friction surfaces | Tighten the large adjusting nut on the brake assembly |
| Adjustment doesn't work | Brake components are worn beyond service limit | Replace the brake disc and related parts |
| Hopper holds but motor overheats | Brake was over-tightened and is dragging | Loosen the adjusting nut slightly to allow proper disengagement |
Ensure your concrete mixer operates safely and efficiently. GARLWAY specializes in construction machinery, offering durable winches, concrete mixers, and batching plants trusted by construction companies and contractors worldwide. If you need reliable equipment or expert support for maintenance and repairs, contact our team today to discuss your project needs and discover how we can enhance your productivity and worksite safety.
Visual Guide
Related Products
- Portable Cement Mixer with Lift Concrete Machine
- Portable Concrete Mixer Machine Equipment for Mixing Concrete
- Skid Steer Self Loading Concrete Mixers for Construction
- Portable Ready Mix Concrete Mixer Equipment
- Portable Electric Concrete Mixer Machine for Cement Mixing
People Also Ask
- What are the power sources for portable cement mixers? Choose the Right Power for Your Job Site
- Why is it necessary to use a portable concrete mixer? Gain Total Control & Efficiency
- What is a portable cement mixer? Achieve Consistent, On-Demand Concrete Mixing
- What was the first recorded version of the portable concrete mixer and who invented it? Discover the 1904 Horse-Drawn Innovation
- How does a portable concrete mixer benefit construction projects? Boost Efficiency & Cut Costs On-Site


