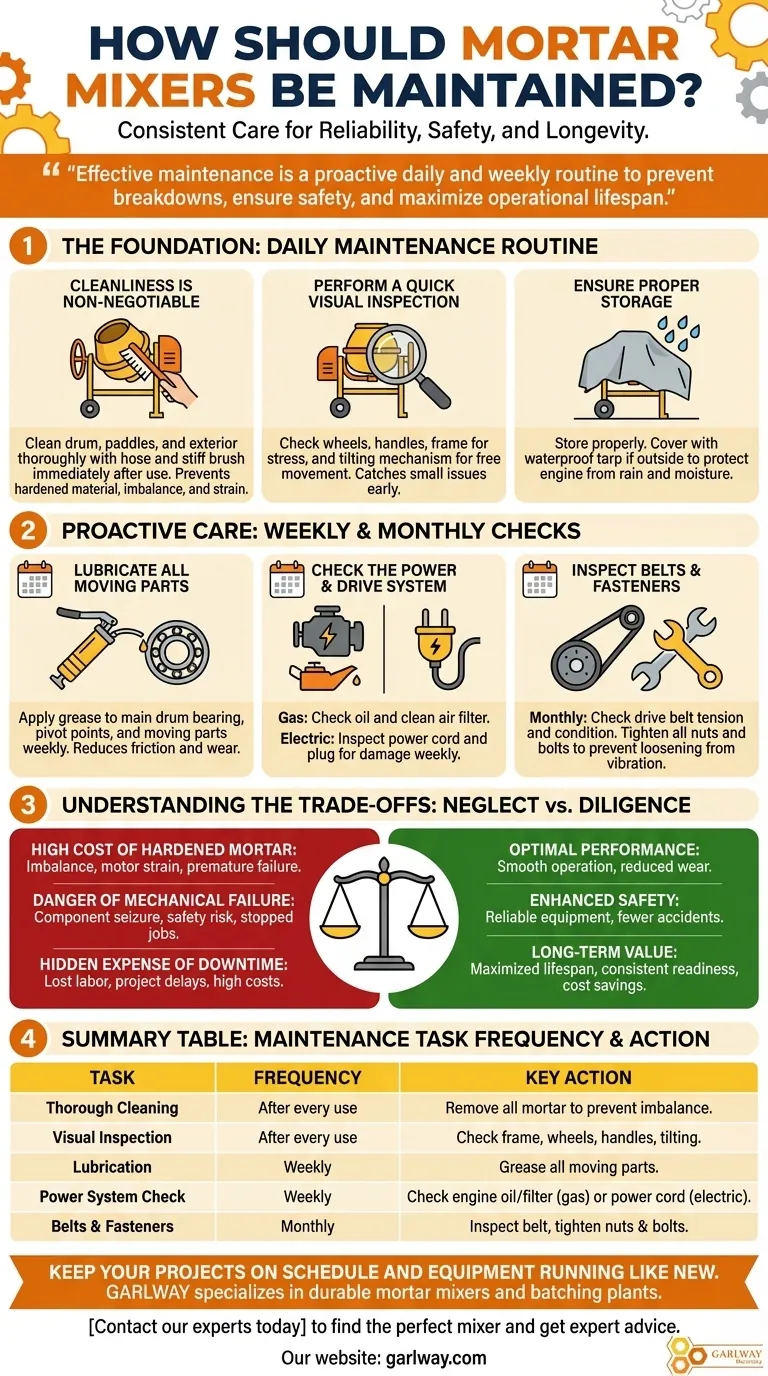
The most critical aspect of mortar mixer maintenance is a consistent routine of cleaning, lubrication, and inspection. Proper care begins the moment you finish a job, as neglecting the equipment for even a short time can lead to hardened material that causes significant damage and strain on the machine.
Effective maintenance is not about fixing what's broken, but about implementing a proactive daily and weekly routine. This approach is the key to preventing breakdowns, ensuring safety, and maximizing the operational lifespan of your mixer.
The Foundation: Daily Maintenance Routine
Consistent, daily habits are the most effective way to prevent the vast majority of mixer problems. These steps should be performed after every single use without exception.
Cleanliness is Non-Negotiable
The single greatest threat to a mixer's health is hardened mortar. Once it sets, it is extremely difficult to remove and creates significant operational issues.
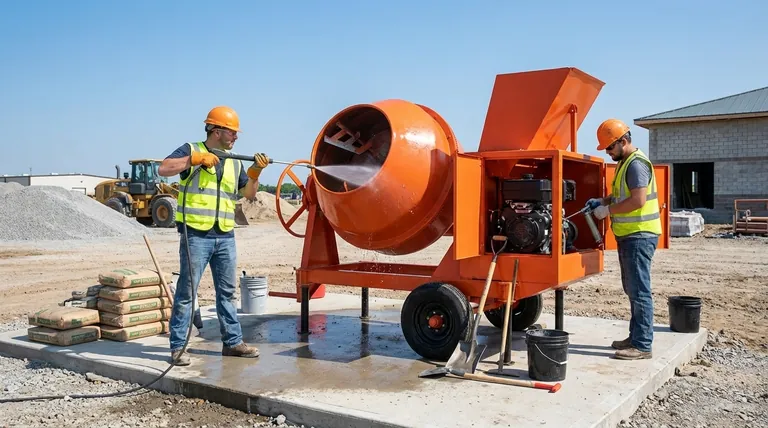
Clean the drum, paddles, and exterior thoroughly with a hose and a stiff brush immediately after emptying the final batch. Leaving material to dry will unbalance the drum, strain the motor, and accelerate wear.
Perform a Quick Visual Inspection
Before storing the mixer, take a moment to look over the key components. Check the wheels and handles to ensure they are secure and intact.
Also, inspect the frame for any signs of stress or cracks and ensure the tilting mechanism moves freely. This quick check can catch small issues before they become major failures.
Ensure Proper Storage
Once clean and inspected, store the mixer properly. If it must be kept outside, cover it with a durable, waterproof tarp.
This simple step protects the engine and moving parts from rain and moisture, which are the primary causes of rust and electrical problems.
Proactive Care: Weekly and Monthly Checks
Beyond the daily routine, a more thorough inspection on a regular schedule will ensure the long-term reliability of your equipment.
Lubricate All Moving Parts
Regular greasing is essential to reduce friction and prevent wear. Once a week, apply grease to all specified lubrication points.
This typically includes the main drum bearing, pivot points for the tilting mechanism, and any other moving parts as indicated by the manufacturer.
Check the Power and Drive System
For a gas-powered mixer, check the engine oil and clean the air filter weekly.
For an electric model, inspect the entire length of the power cord and plug for any cuts, frays, or damage that could pose a safety hazard.
Inspect Belts and Fasteners
On a monthly basis, check the tension and condition of the drive belt. Look for cracks or excessive wear and adjust or replace it as needed.
The vibration from normal operation can loosen nuts and bolts over time. Take a few minutes to check and tighten all critical fasteners on the frame, engine mount, and wheel assemblies.
Understanding the Trade-offs: Neglect vs. Diligence
Failing to maintain a mixer doesn't save time; it merely postpones and multiplies the cost.
The High Cost of Hardened Mortar
Caked-on mortar adds significant weight to one side of the drum, creating an imbalance that puts immense strain on the motor, bearings, and frame. This is the leading cause of premature equipment failure.
The Danger of Mechanical Failure
A component that fails due to a lack of lubrication or inspection can seize up or break apart during operation. This not only stops the job but also creates a serious safety risk for the operator.
The Hidden Expense of Downtime
A broken mixer brings a job to a halt. The cost of lost labor and project delays will almost always exceed the small amount of time required for proper daily and weekly maintenance.
How to Apply This to Your Work
Integrate these steps into a simple, repeatable checklist to ensure nothing is overlooked.
- If your primary focus is immediate readiness: Make post-use cleaning an unbreakable rule for your entire crew.
- If your primary focus is long-term reliability: Designate one person to perform the weekly lubrication and inspection tasks every Friday afternoon.
- If your primary focus is safety: Emphasize the weekly electrical cord and monthly fastener checks to prevent unexpected failures on the job site.
Consistent care is the most effective way to ensure your mixer remains a reliable and valuable asset on every job.
Summary Table:
| Maintenance Task | Frequency | Key Action |
|---|---|---|
| Thorough Cleaning | After every use | Remove all mortar from drum and paddles to prevent imbalance and strain. |
| Visual Inspection | After every use | Check frame, wheels, handles, and tilting mechanism for damage. |
| Lubrication | Weekly | Grease all moving parts like drum bearings and pivot points. |
| Power System Check | Weekly | Check engine oil/filter (gas) or power cord (electric). |
| Belts & Fasteners | Monthly | Inspect drive belt and tighten all nuts and bolts. |
Keep your projects on schedule and your equipment running like new. Proper maintenance is key, but it starts with a reliable machine. GARLWAY specializes in durable construction machinery, including robust mortar mixers, concrete mixers, and batching plants designed for construction companies and contractors who value efficiency and longevity.
Contact our experts today to find the perfect mixer for your needs and get expert advice on keeping it in peak condition.
Visual Guide
Related Products
- JDY350 Electric Hydraulic Mortar Mud Concrete Mixer
- JDC350 Small Cement Concrete Mortar Mixer
- Mini Cement Mortar Mixer Truck for Construction
- Belle Mixer Drum Self Loading Mortar Mixers JS3000
- JS1000 Volumetric Concrete Mortar Mixer for Sale Skid Steer Cement Mixer
People Also Ask
- How are mortar mixers utilized in concrete and grout projects? Maximize Your Mixing Efficiency
- Why is it important to choose the right mixer for a construction project? Ensure Quality, Efficiency & Durability
- What size mortar mixer is suitable for residential projects? Find the Perfect 3-5 Cu Ft Mixer for Your Crew
- When are electric mortar mixers typically used? Find the Perfect Tool for Small to Medium-Sized Jobs
- What is a mortar mixer and what is its primary use? Master Masonry with the Right Equipment


