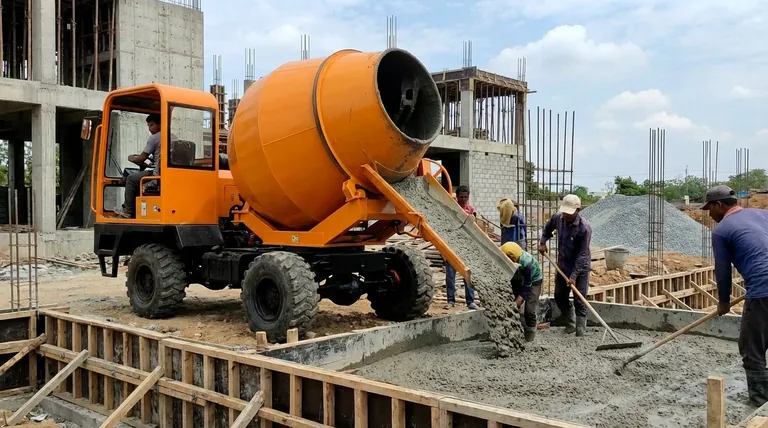
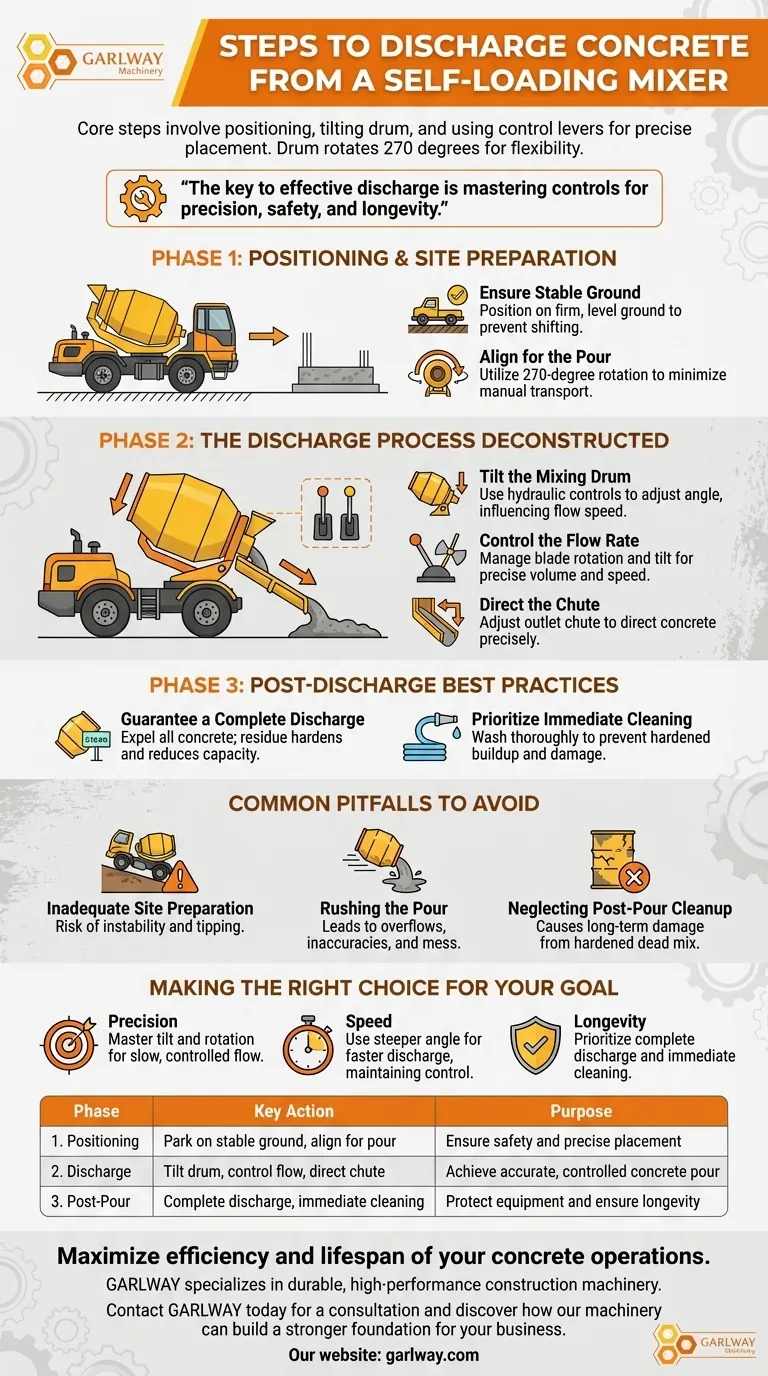
The core steps to discharge a self-loading concrete mixer involve positioning the vehicle for stability, tilting the rotating mixing drum, and using control levers to precisely manage the flow of concrete onto the pour site. The drum's ability to rotate up to 270 degrees allows for highly flexible and accurate placement without needing to constantly reposition the entire machine.
The key to effective discharge is not simply emptying the drum, but mastering the controls to transform the mixer into a precise concrete placement tool, ensuring accuracy, safety, and equipment longevity.
Phase 1: Positioning and Site Preparation
Before any concrete is poured, proper positioning of the mixer is critical for both safety and efficiency. This initial step sets the foundation for a successful discharge.
Ensure Stable Ground
The mixer, when fully loaded, is extremely heavy. Always position the vehicle on firm, level ground to prevent shifting or tipping during the discharge process.
Align for the Pour
Utilize the mixer's maneuverability and the drum's 270-degree rotation to get as close as possible to the final pouring location. This minimizes the need for manual transport of concrete and reduces the risk of spillage.
Phase 2: The Discharge Process Deconstructed
Once the mixer is securely in position, the operator can begin the controlled process of discharging the well-mixed concrete.
Tilt the Mixing Drum
The primary action for discharge is tilting the drum downwards. The operator uses hydraulic controls to adjust the tilt angle, which directly influences the speed of the concrete flow.
Control the Flow Rate
A dedicated control lever allows the operator to manage the rotation of the internal mixing blades. This rotation works with the drum's tilt angle to push the concrete out smoothly, enabling precise control over the volume and speed of the pour.
Direct the Chute
The operator can adjust the outlet chute to precisely direct the concrete into forms, trenches, or specific areas of a slab, ensuring the material goes exactly where it is needed.
Phase 3: Post-Discharge Best Practices
The job isn't finished once the concrete is out. Proper procedure after the pour is essential for maintaining the equipment in optimal condition.
Guarantee a Complete Discharge
Ensure every last bit of concrete is expelled from the drum. Even a small amount of residue can harden, reducing the drum's capacity and potentially damaging the mixing blades over time.
Prioritize Immediate Cleaning
As soon as the discharge is complete, the drum and chute must be washed out thoroughly. This prevents the buildup of hardened concrete, which is difficult and costly to remove and can compromise the quality of future batches.
Common Pitfalls to Avoid
Mistakes during discharge can lead to wasted material, poor quality finishes, and equipment damage. Understanding these common errors is key to avoiding them.
Inadequate Site Preparation
Attempting to discharge on soft or uneven ground is a significant safety risk. The shift in weight as the concrete leaves the drum can easily destabilize the entire vehicle.
Rushing the Pour
Discharging too quickly can lead to overflows, inaccurate placement, and a messy worksite. A steady, controlled flow is always superior to a rushed dump.
Neglecting Post-Pour Cleanup
Skipping or delaying the cleaning process is the single most common cause of long-term damage to a self-loading mixer. Hardened concrete, or "dead mix," is abrasive and destructive.
Making the Right Choice for Your Goal
Your operational focus will determine which part of the process you emphasize most.
- If your primary focus is precision pouring: Master the delicate interplay between a slight drum tilt and the blade rotation speed for a slow, easily controlled flow.
- If your primary focus is speed for bulk pours: Use a steeper drum angle for a faster discharge, but never sacrifice control and stability.
- If your primary focus is equipment longevity: Make complete discharge and immediate, thorough cleaning your highest priority after every single use.
Mastering this process ensures every pour is safe, accurate, and efficient.
Summary Table:
| Phase | Key Action | Purpose |
|---|---|---|
| 1. Positioning | Park on stable ground, align for pour | Ensure safety and precise placement |
| 2. Discharge | Tilt drum, control flow rate, direct chute | Achieve accurate, controlled concrete pour |
| 3. Post-Pour | Complete discharge, immediate cleaning | Protect equipment and ensure longevity |
Maximize the efficiency and lifespan of your concrete operations. GARLWAY specializes in durable, high-performance construction machinery, including self-loading mixers designed for contractors who value precision and reliability. Let our experts help you choose the right equipment for your projects.
Contact GARLWAY today for a consultation and discover how our machinery can build a stronger foundation for your business.
Visual Guide
Related Products
- Skid Steer Self Loading Concrete Mixers for Construction
- Belle Mixer Drum Self Loading Mortar Mixers JS3000
- Portable Cement Mixer with Lift Concrete Machine
- Portable Concrete Mixer Machine Equipment for Mixing Concrete
- Portable Ready Mix Concrete Mixer Equipment
People Also Ask
- How does the control system improve production efficiency in a self loading concrete mixer? Automate Mixing for Speed & Quality
- How are materials lifted into the mixing drum in a self loading concrete mixer? See the Automated Process
- What are the advantages of a self-loading concrete mixer? Maximize On-Site Efficiency & Cut Costs
- What benefits does the precision mixing capability of self-loading concrete mixers provide? Ensure On-Site Structural Integrity
- How should materials be loaded into a self-loading concrete mixer? Master the Step-by-Step Process


