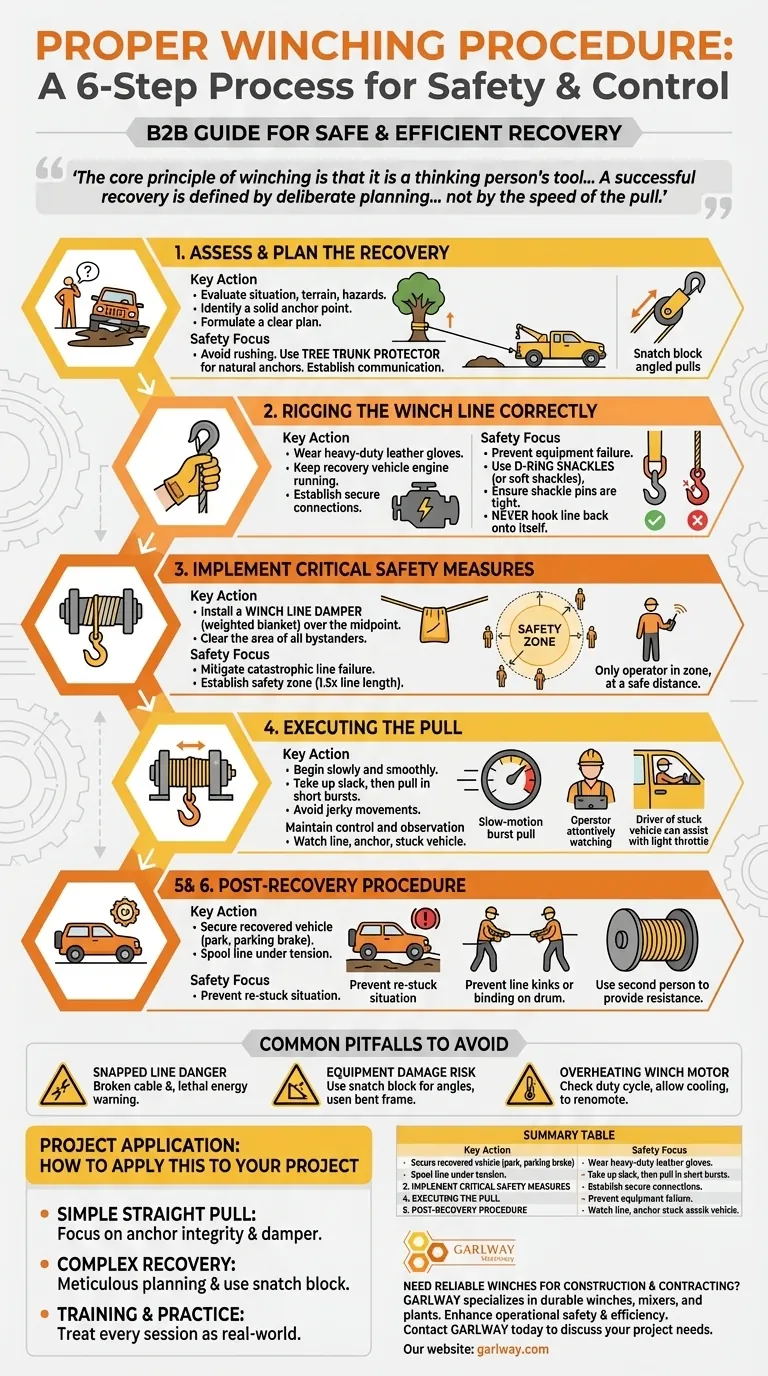
Proper winching procedure is a methodical, six-step process focused on safety and control. It involves assessing the situation and planning the recovery, setting up the winch line with secure connections, installing a safety damper, clearing the area of all people, executing a smooth and controlled pull, and finally, stowing all equipment correctly.
The core principle of winching is that it is a thinking person's tool, not a brute force solution. A successful recovery is defined by deliberate planning and the meticulous application of safety protocols, not by the speed of the pull.
Step 1: Assess and Plan the Recovery
The most critical phase of any recovery happens before you ever touch the winch line. Rushing this step is the single most common cause of equipment damage and injury.
Evaluate the Situation
First, analyze why the vehicle is stuck. Consider the terrain, the stability of both the stuck vehicle and the anchor vehicle, and any potential hazards like slopes or obstacles.
Identify a Solid Anchor Point
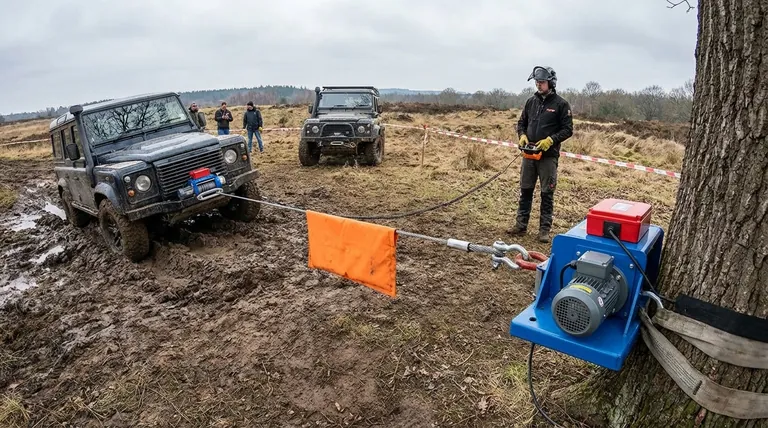
Your anchor point must be unquestionably strong. A healthy, large tree is a common choice, but you must always use a tree trunk protector strap to avoid damaging the tree and your winch line. A second, securely parked vehicle can also serve as a solid anchor. Never use a dead tree, a rock, or the trailer hitch ball on a vehicle.
Formulate a Clear Plan
Determine the straightest possible pulling line. If a straight pull isn't possible, plan to use a snatch block to change the angle. Establish clear hand signals or radio communication with anyone assisting, especially the driver of the stuck vehicle.
Step 2: Rigging the Winch Line Correctly
Proper setup prevents equipment failure. Always wear heavy-duty leather gloves when handling a winch line, as steel cables can have sharp burrs and synthetic lines can collect debris.
Keep the Engine Running
Keep the recovery vehicle's engine running throughout the process. Winching draws a massive amount of electrical current, and this ensures the battery remains charged by the alternator.
Establish Secure Connections
Use D-ring shackles (or soft shackles for synthetic lines) to connect your winch hook to straps or anchor points. Never hook the winch line back onto itself, as this can severely damage the line. Ensure all shackle pins are properly tightened.
Step 3: Implement Critical Safety Measures
These steps are non-negotiable and are designed to mitigate the danger of a catastrophic line failure.
Install a Winch Line Damper
A winch line damper is a weighted blanket or specialized bag placed over the midpoint of the tensioned line. If the line snaps, the damper absorbs a massive amount of the kinetic energy, forcing the broken ends to fall to the ground instead of whipping through the air. A heavy coat or floor mat can be used in a pinch.
Clear the Area of All Bystanders
Establish a safety zone that is at least 1.5 times the length of the extended winch line. No one should be inside this zone except the winch operator, who should be safely inside the vehicle or at a significant distance managing the remote.
Step 4: Executing the Pull
With the area clear and the rigging complete, you can begin the recovery.
Begin Winching Slowly and Smoothly
Take up the slack in the line slowly. Once tensioned, begin the pull with short, controlled bursts. Avoid jerky movements, which put immense shock loads on all components.
Maintain Control and Observation
The winch operator's job is to watch the line, the anchor, and the stuck vehicle. If you have a spotter, they should be in a safe location to observe and communicate any issues.
Assist the Winch
If possible and safe, the driver of the stuck vehicle can assist by slowly turning their wheels in the direction of the pull. This light throttle application can significantly reduce the strain on the winch motor.
Understanding the Common Pitfalls
Even with the right steps, it's crucial to understand the inherent risks and how to avoid them.
The Danger of a Snapped Line
A winch line under load stores a potentially lethal amount of energy. A failure can send the cable or a shackle flying with enough force to cause fatal injury. This is why a damper and clearing the area are absolutely mandatory.
Risk of Equipment Damage
Pulling at sharp angles without a snatch block can damage the winch by causing the line to bunch up on one side of the drum. It also puts immense side-load on vehicle frames and suspension components.
Overheating the Winch Motor
Winch motors are not designed for continuous operation. Long, heavy pulls can cause them to overheat. Pay attention to the winch's duty cycle (found in its manual) and let it cool down periodically during a difficult recovery.
Step 5 & 6: Post-Recovery Procedure
Once the vehicle is free, the job isn't finished.
Secure the Recovered Vehicle
Before you start disconnecting anything, ensure the recovered vehicle is in park (or in gear) with the parking brake fully engaged and on stable ground.
Spool the Line Under Tension
To prevent the line from kinking or binding on the drum, it must be spooled back in under light tension. The easiest way is to have a second person provide resistance by holding the line (with gloves on) as you slowly wind it in.
How to Apply This to Your Project
Your approach should be dictated by the complexity of the situation, but the core safety principles never change.
- If your primary focus is a simple, straight-line pull: Your main priorities are verifying the integrity of your anchor point and correctly using a winch line damper.
- If your primary focus is a complex recovery (e.g., angled or deep mud): Meticulous planning is key; you will likely need a snatch block to manage pull angles and reduce the load on your winch.
- If your primary focus is training or practice: Treat every session as a real-world scenario, following every single safety step to build correct and reflexive habits.
Ultimately, a winch transforms a potentially trip-ending problem into a solvable one when used with knowledge and discipline.
Summary Table:
| Step | Key Action | Safety Focus |
|---|---|---|
| 1 | Assess & Plan the Recovery | Identify hazards & solid anchor point |
| 2 | Rigging the Winch Line | Secure connections with D-ring shackles |
| 3 | Implement Safety Measures | Install winch line damper & clear area |
| 4 | Execute the Pull | Slow, controlled winching with observation |
| 5 & 6 | Post-Recovery Procedure | Secure vehicle & spool line under tension |
Need reliable winches for your construction or contracting projects? GARLWAY specializes in construction machinery, offering durable winches, concrete mixers, and batching plants designed for demanding recovery and lifting tasks. Our equipment ensures safety and efficiency, helping your team handle complex recoveries with confidence. Contact GARLWAY today to discuss your project needs and discover how our solutions can enhance your operational safety and productivity.
Visual Guide
Related Products
- 12000 lb Electric Boat Trailer Winch with Windlass Anchor Warn
- Small Electric Winch 120V and 240V for Compact Applications
- Hydraulic Winding Engine Harbor Freight Winch
- Electric and Hydraulic Winch for Heavy Duty Applications
- Quick Windlass Portable Winch for Truck and Boat Best Boat Winch
People Also Ask
- What maintenance steps are specific to boat trailer winches? Ensure Safety & Reliability at the Ramp
- How strong of a winch do I need for my boat? Get the Right Pulling Power for Trailering & Anchoring
- What types of boat trailer winches are available? Choose the Right Winch for Your Boat
- What size winch do I need for my boat? Get the Right Capacity for Safe Hauling
- How does an electric boat trailer winch differ from a manual one? Effort vs. Control Explained