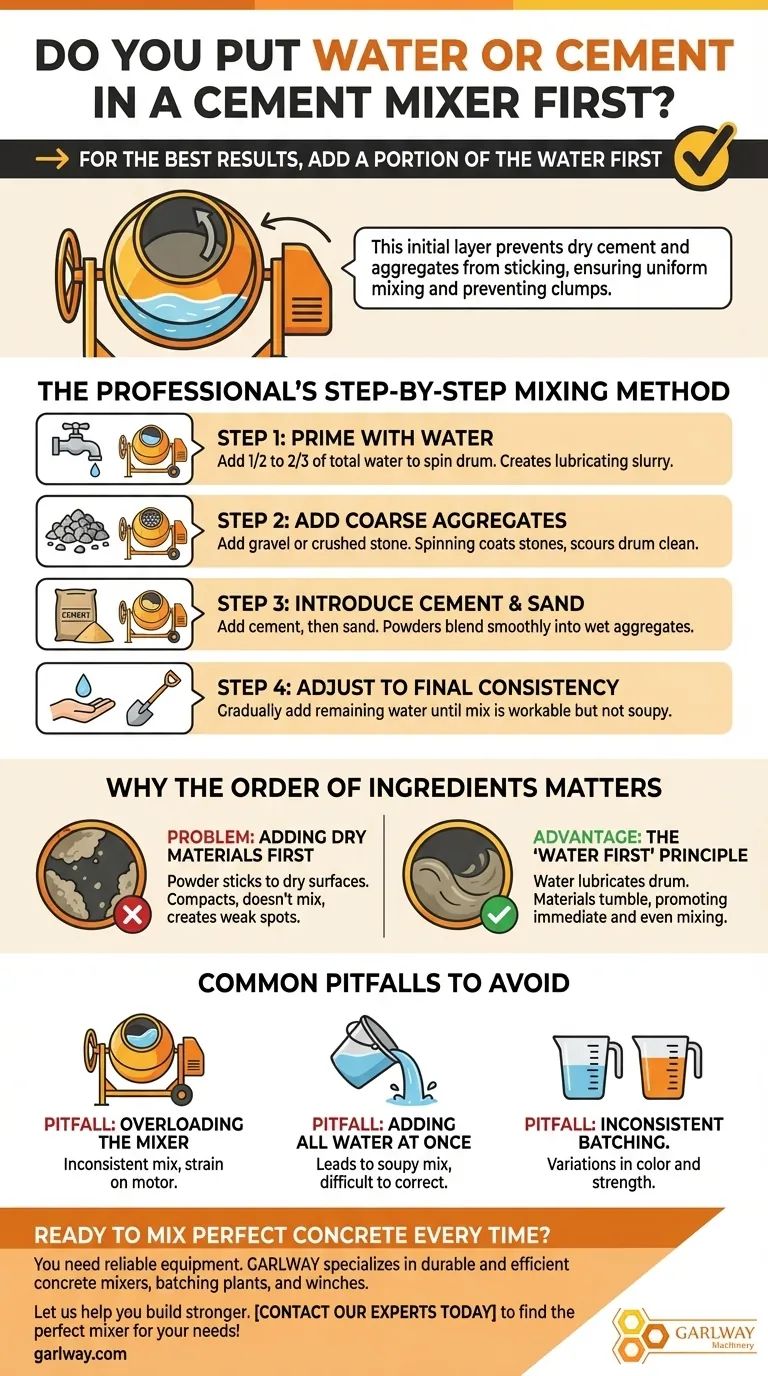
For the best results, you should add a portion of the water to the cement mixer first. This initial layer of water prevents dry cement powder and aggregates from sticking to the inside of the drum, ensuring all your materials are incorporated into the mix and preventing the formation of stubborn, dry clumps.
The most effective method for mixing concrete is not about adding all of one ingredient first. It involves a strategic layering of water, aggregates, and cement to prevent clumping and ensure every particle is properly coated, resulting in a stronger, more uniform final product.

Why the Order of Ingredients Matters
The sequence in which you add materials to a cement mixer isn't arbitrary; it directly impacts the quality, strength, and workability of your final concrete or mortar. The goal is to create a homogenous slurry where cement paste evenly coats every grain of sand and piece of aggregate.
The Problem with Adding Dry Materials First
If you start with dry cement, sand, or gravel in a dry mixer drum, the powder will immediately stick to the metal surfaces. As the drum rotates, these stuck-on patches can become compacted, refusing to mix properly and creating weak spots in your final pour.
The Advantage of the "Water First" Principle
Starting with water lubricates the drum's interior. As you add aggregates and cement, they tumble through the water rather than against a dry, sticky surface. This promotes immediate and even mixing from the very start.
The Professional's Step-by-Step Mixing Method
While simply adding water first is a good start, professionals use a more nuanced technique to guarantee a perfect mix every time. This method ensures all aggregates are fully wetted and the cement is distributed evenly.
Step 1: Prime the Drum with Water
Begin by adding about half to two-thirds of the total water required for your batch into the spinning mixer. This creates the initial lubricating slurry.
Step 2: Add the Coarse Aggregates
Next, add your coarse aggregate, such as gravel or crushed stone. The spinning action will coat each stone in water while the abrasive nature of the aggregate helps scour the inside of the drum, keeping it clean.
Step 3: Introduce the Cement and Sand
With the wet aggregates tumbling, add the cement, followed by the sand. This allows the powders to blend smoothly into the mix without clumping, creating a rich paste.
Step 4: Adjust to Final Consistency
Gradually add the remaining water until the concrete reaches the desired consistency. Look for a mix that is workable but not soupy; it should flow off a shovel without being runny or overly stiff.
Common Pitfalls to Avoid
Understanding the correct order is only half the battle. To ensure a successful project, you must also be aware of common mistakes that can compromise the quality of your concrete.
Pitfall: Overloading the Mixer
Every mixer has a capacity limit. Overfilling the drum prevents the materials from tumbling freely, resulting in an inconsistent, poorly blended mix. It also puts significant strain on the motor. Always mix in manageable batches.
Pitfall: Adding All the Water at Once
Dumping all the required water in at the beginning can lead to a soupy mix, especially if your aggregates were already damp. It is always easier to add more water to a stiff mix than it is to correct a wet one. Hold some water back for final adjustments.
Pitfall: Inconsistent Batching
For larger projects requiring multiple batches, it's crucial to use the exact same proportions of water, cement, sand, and aggregate every time. Inconsistency will lead to variations in color and strength in the finished product.
Making the Right Choice for Your Goal
By controlling the mixing process, you control the outcome of your project. Use these guidelines to tailor your approach.
- If your primary focus is maximum strength and durability: Follow the professional four-step layering method precisely to ensure the strongest possible chemical bond in the concrete.
- If your primary focus is speed for a small repair: The simple "water first, then pre-mixed concrete bag" method will work, but be vigilant about scraping the sides to break up any potential clumps.
- If you are new to using a mixer: Always start with less water than you think you need; it's far easier to add a little more water than to fix a soupy batch by adding more dry mix.
By understanding the why behind the mixing order, you can consistently produce high-quality concrete for any project.
Summary Table:
| Mixing Step | Key Action | Purpose |
|---|---|---|
| Step 1 | Add 1/2 to 2/3 of water first | Lubricates the drum to prevent sticking and clumping |
| Step 2 | Add coarse aggregates (gravel) | Coats stones and helps scour the drum clean |
| Step 3 | Add cement, then sand | Allows powders to blend smoothly into a rich paste |
| Step 4 | Gradually add remaining water | Achieve the perfect, workable consistency |
Ready to mix perfect concrete every time? You need a reliable partner and reliable equipment. GARLWAY specializes in construction machinery, offering durable and efficient concrete mixers, concrete batching plants, and winches for construction companies and contractors globally. Let us help you build stronger. Contact our experts today to find the perfect mixer for your project needs!
Visual Guide
Related Products
- HZS25 Best Cement Mixer for Quick Mix Concrete at Bunnings
- JDC350 Small Cement Concrete Mortar Mixer
- JW1000 Mobile Cement Mixer Concrete Mixer Truck and Batching Plant
- JZC400 Mobile Small Concrete Mixer Cement Mixer Machine
- Concrete Cement Mixer Machine Drum Mixer for Construction
People Also Ask
- Why is it important to clean the cement mixer after use? Prevent Costly Damage and Ensure Quality Concrete
- How does cleaning a cement mixer after use benefit its performance? Maximize Lifespan and Mix Quality
- What are the key benefits of using a cement mixer on a construction site? Boost Efficiency, Quality & Safety
- What factors should be considered when choosing a cement mixer? Select the Right Mixer for Efficiency and Durability
- What are the main components of a cement mixer? A Guide to Core Parts & Functions


