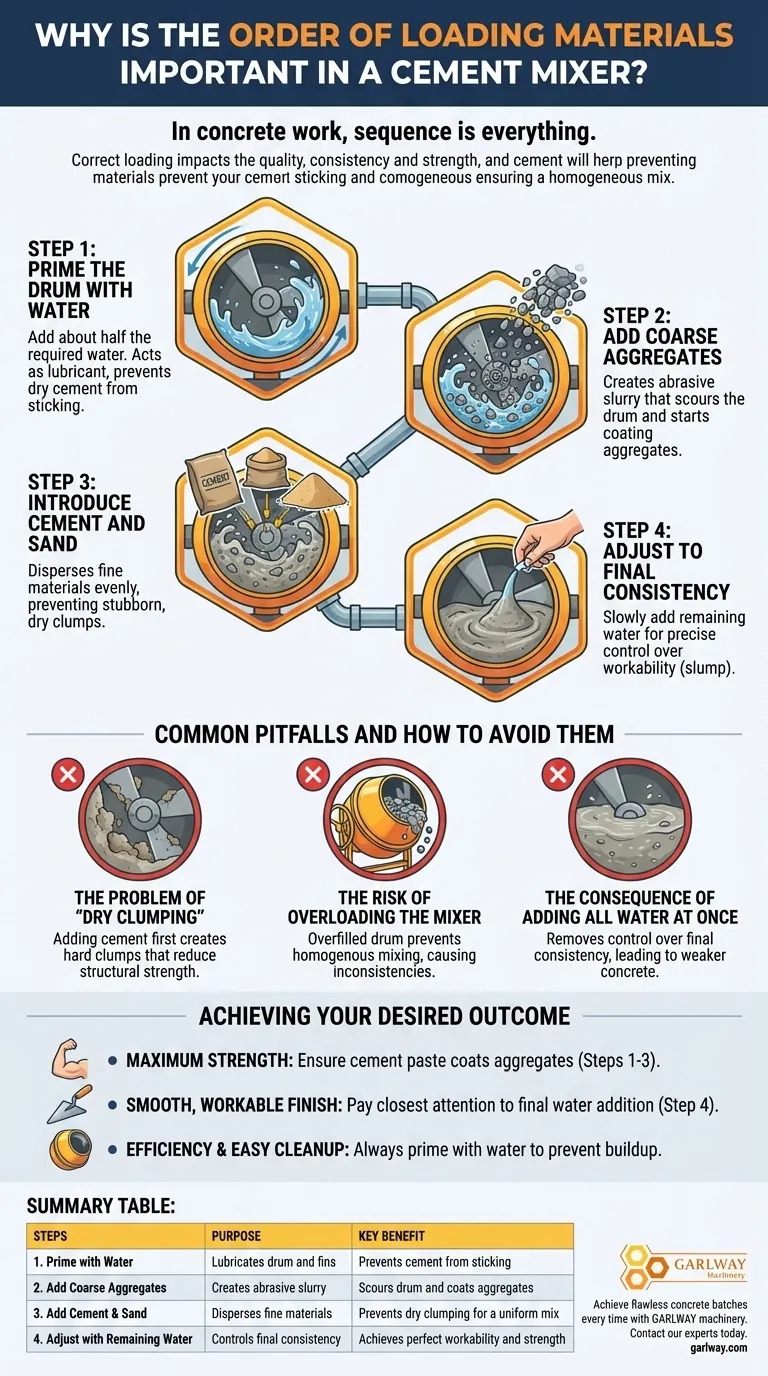
In concrete work, sequence is everything. The order in which you load materials into a cement mixer is not arbitrary; it is a critical step that directly impacts the quality, consistency, and strength of your final concrete. Following the correct procedure prevents dry cement from sticking to the drum and ensures every particle of sand and aggregate is properly coated, leading to a homogenous and reliable mix.
The correct loading order is a preventative measure. By adding water and aggregates first, you create a lubricated, abrasive slurry that keeps dry cement from clumping and sticking, ensuring a uniform and high-quality concrete mix from the start.

The Principles Behind the Proper Sequence
Understanding why the order matters allows you to produce better concrete consistently. The process isn't just about combining ingredients; it's about preparing each component to bond effectively with the next.
Step 1: Prime the Drum with Water
The process should always begin by adding about half of your total required water into the empty, spinning drum.
This initial water acts as a lubricant. It coats the inside of the drum and the mixing fins, creating a thin film that prevents dry cement powder from sticking to the metal surfaces.
Step 2: Add the Coarse Aggregates
With the water sloshing, add your coarse aggregates, such as gravel or crushed stone.
The combination of water and the tumbling action of the gravel creates an abrasive slurry. This slurry effectively scours the inside of the drum, further preventing any material buildup and starting the process of coating the aggregates.
Step 3: Introduce Cement and Sand
Now, add your cement, followed immediately by the sand.
These finer materials are dispersed evenly into the moving slurry. Because the drum is already wet and the aggregates are coated, the cement has no dry surfaces to cling to, preventing the formation of stubborn, dry clumps.
Step 4: Adjust to Final Consistency
Finally, slowly add the remaining water until you reach the desired consistency, often referred to as "slump."
This final step gives you precise control over the workability of the concrete. Adding water gradually allows you to avoid a soupy, weak mix and dial in the perfect texture for your specific application.
Common Pitfalls and How to Avoid Them
Deviating from the correct sequence can introduce weaknesses and inconsistencies into your concrete, compromising the integrity of your project.
The Problem of "Dry Clumping"
Adding cement to a dry drum is the most common mistake. The powder immediately sticks to the fins and walls, forming hard clumps that never fully integrate into the mix.
These clumps create voids and weak spots in the final cured concrete, significantly reducing its structural strength.
The Risk of Overloading the Mixer
Regardless of the loading order, overloading the mixer is a critical error. An overfilled drum prevents the materials from tumbling freely.
Without proper tumbling action, the ingredients cannot mix homogenously. The result is an inconsistent batch with pockets of poorly mixed material.
The Consequence of Adding All Water at Once
Dumping all the water in at the beginning removes your ability to control the final consistency.
Different batches of sand and aggregate can have varying moisture content. By holding some water back, you can compensate for these variables and ensure your mix isn't too wet, which leads to weaker concrete.
Achieving Your Desired Outcome
The right technique depends on prioritizing the most critical attribute for your project, whether it's raw strength, a smooth finish, or simply an efficient workflow.
- If your primary focus is maximum strength: Ensure the cement paste thoroughly coats every aggregate by adding cement and sand after the initial water and gravel.
- If your primary focus is a smooth, workable finish: Pay closest attention to the final step, adding the remaining water gradually to achieve the perfect slump.
- If your primary focus is efficiency and easy cleanup: Always start by priming the drum with water to prevent the frustrating and damaging buildup of hardened cement.
Mastering this loading sequence transforms concrete mixing from a guess into a predictable and reliable process.
Summary Table:
| Loading Step | Purpose | Key Benefit |
|---|---|---|
| 1. Prime with Water | Lubricates drum and fins | Prevents cement from sticking |
| 2. Add Coarse Aggregates | Creates abrasive slurry | Scours drum and coats aggregates |
| 3. Add Cement & Sand | Disperses fine materials | Prevents dry clumping for a uniform mix |
| 4. Adjust with Remaining Water | Controls final consistency | Achieves perfect workability and strength |
Achieve flawless concrete batches every time with GARLWAY machinery.
As a leading provider of construction equipment for contractors and construction companies worldwide, GARLWAY understands that the quality of your mix starts with the right process and the right equipment. Our durable concrete mixers and batching plants are engineered to support these best practices, delivering the reliable performance you need for demanding projects.
Contact our experts today to find the perfect mixer or batching plant for your specific application and build with confidence.
Visual Guide
Related Products
- HZS25 Best Cement Mixer for Quick Mix Concrete at Bunnings
- JDC350 Small Cement Concrete Mortar Mixer
- Concrete Cement Mixer Machine Drum Mixer for Construction
- JW1000 Mobile Cement Mixer Concrete Mixer Truck and Batching Plant
- JZC500 Large Cement Mixer Machine Price for Concrete Mix
People Also Ask
- What are the key benefits of using a cement mixer on a construction site? Boost Efficiency, Quality & Safety
- What is the proper sequence for loading materials into a cement mixer? Ensure Strong, Durable Concrete
- What are the main components of a cement mixer? A Guide to Core Parts & Functions
- What distinguishes cement mixers from other drum mixer types? The Key Design for Concrete Strength
- What are some tips for using a cement mixer effectively? Maximize Your Mixer's Performance & Concrete Quality


