If your hoist is leaking oil, you must immediately begin a systematic diagnosis to identify the root cause. The issue often originates with the oil seal, but a proper fix requires checking the seal itself, the main shaft surface it contacts, internal oil pressure, and the fit of the components.
An oil leak is a critical safety and maintenance signal, not just a minor annoyance. Simply replacing a seal without understanding why it failed often leads to a recurring problem; a thorough diagnosis is essential for a reliable and safe repair.
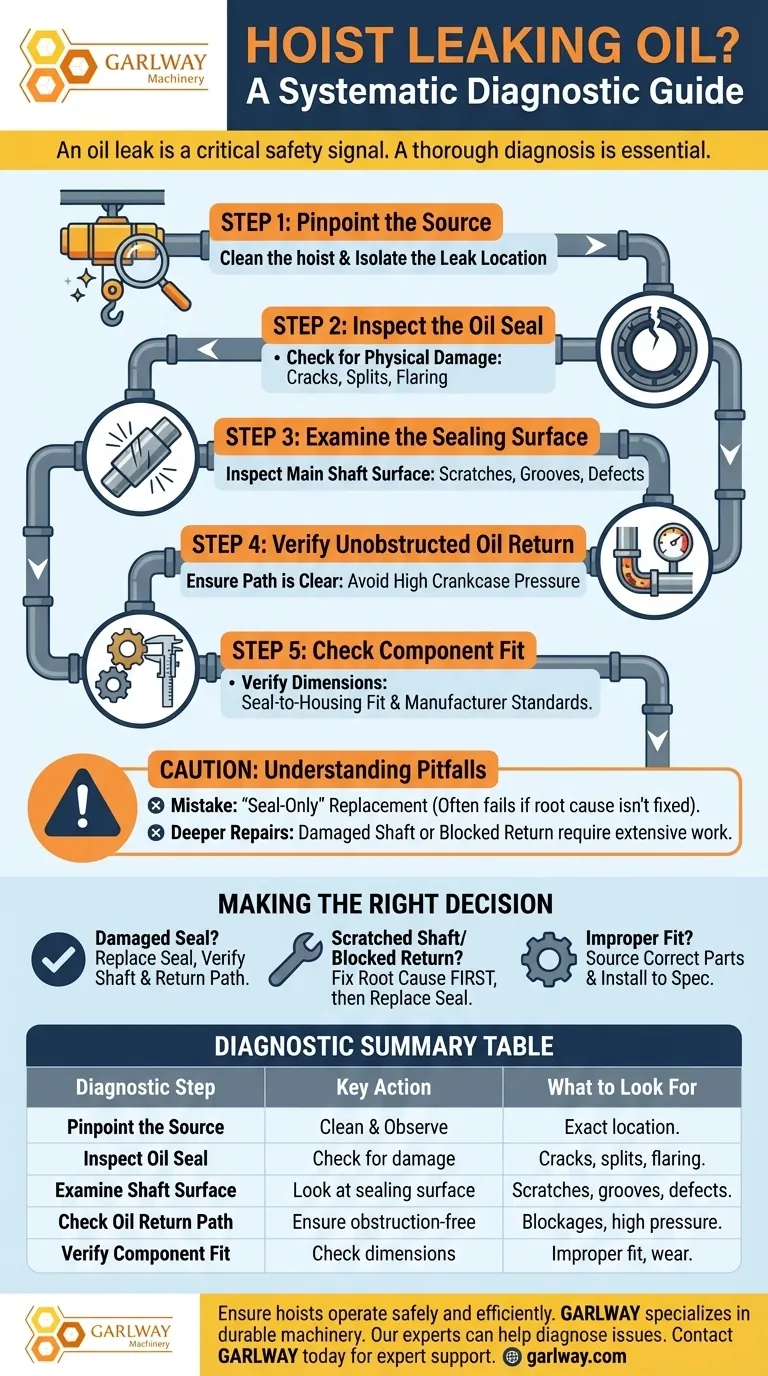
The First Step: Pinpointing the Source
Isolate the Leak Location
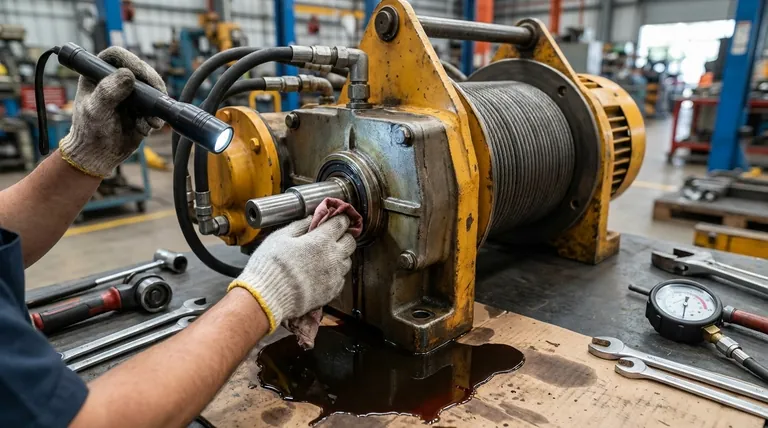
Before disassembling any components, clean the hoist thoroughly and observe it to pinpoint the exact source of the oil.
This initial step prevents unnecessary work and ensures your diagnostic efforts are focused on the correct area.
A Systematic Diagnostic Approach
Once you have a general idea of the leak's origin, follow a structured inspection process. The problem almost always involves the oil seal system.
Inspecting the Oil Seal for Obvious Damage
The most common culprit is the oil seal itself. Carefully examine it for any signs of physical failure.
Look for cracks, splits, or flaring along the edge of the seal. Any visible damage is a clear indication that the seal must be replaced.
Examining the Sealing Surface
A new seal will fail immediately if the surface it seals against is damaged.
Inspect the sealing surface on the main shaft for any scratches, grooves, or defects. A compromised surface will create a path for oil to escape, regardless of the seal's condition. If you find defects, the shaft must be repaired or replaced.
Verifying Unobstructed Oil Return
Sometimes the problem isn't the seal, but the pressure behind it.
Ensure the return oil path is unobstructed. A blockage can cause high crankcase pressure, which can force oil past a perfectly good seal or even detach it from its housing. This is a frequently overlooked but critical check.
Checking Component Fit and Dimensions
The final check ensures the parts are working together as designed.
Verify the fit dimensions between the oil seal and the housing (the "box") it sits in. If the fit is too loose or too tight due to wear or an incorrect part, it will not seal effectively. Replace any components that do not meet the manufacturer's standards.
Understanding the Pitfalls
A superficial fix can be tempting, but it often wastes time and compromises safety. Understanding the implications of your findings is crucial.
The Mistake of a "Seal-Only" Replacement
If you find a damaged seal, it's easy to assume that's the only problem.
However, if the underlying cause was a scratched shaft or high crankcase pressure, a brand-new seal will fail again in short order. This leads to repeated downtime and a false sense of security.
When Deeper Repairs Are Necessary
The diagnostic steps reveal the true nature of the repair.
A damaged shaft surface or a blocked oil return are more serious issues. These problems require more intensive work than a simple seal swap but are essential for restoring the hoist's long-term reliability and operational safety.
Making the Right Decision for Your Hoist
Your findings will dictate the correct course of action. Use this guide to determine the next steps.
- If your primary finding is a physically damaged seal: The immediate task is to replace the seal, but you must still verify the shaft and oil return path are in good condition.
- If your primary finding is a scratched shaft or blocked oil return: The repair must focus on addressing this root cause first; replacing the seal is the final step after the core problem is solved.
- If your primary finding is an improper component fit: You must source and install the correct parts according to manufacturer specifications to ensure a durable seal.
By treating an oil leak as a diagnostic signal, you shift from reactive repairs to proactive maintenance, ensuring the safety and longevity of your equipment.
Summary Table:
| Diagnostic Step | Key Action | What to Look For |
|---|---|---|
| Pinpoint the Source | Clean the hoist and observe. | Exact location of the oil leak. |
| Inspect the Oil Seal | Check for physical damage. | Cracks, splits, or flaring on the seal. |
| Examine the Shaft Surface | Look at the sealing surface. | Scratches, grooves, or defects on the main shaft. |
| Check Oil Return Path | Ensure it is unobstructed. | Blockages causing high crankcase pressure. |
| Verify Component Fit | Check seal-to-housing dimensions. | Improper fit due to wear or incorrect parts. |
Ensure your hoists operate safely and efficiently.
A persistent oil leak can lead to equipment failure and costly downtime. GARLWAY specializes in durable construction machinery, including reliable hoists and winches designed for demanding job sites.
Our experts can help you diagnose issues and provide the right parts or equipment for a long-lasting solution.
Contact GARLWAY today for expert support and reliable machinery that keeps your projects moving.
Visual Guide
Related Products
- Electric Hoist Winch Boat Anchor Windlass for Marine Applications
- Electric and Hydraulic Winch for Heavy Duty Applications
- Hydraulic Winding Engine Harbor Freight Winch
- Portable Cement Mixer with Lift Concrete Machine
- 12000 lb Electric Boat Trailer Winch with Windlass Anchor Warn
People Also Ask
- What is the difference in efficiency between single-drum and double-drum electric hoists?
- What are the main benefits of a boat anchor winch? Boost Safety & Efficiency for Your Vessel
- What are the advantages of installing an electric anchor winch on a boat? Boost Safety & Ease for Boaters
- How does a boat anchor winch work? A Guide to Reliable Anchor Handling
- How does an electric anchor winch work? Power, Safety, and Reliable Operation Explained