To effectively prevent rust and corrosion in cement tanks, you must implement a disciplined cycle of regular inspection, thorough cleaning, and immediate repair of the protective coating. This proactive approach addresses rust at its earliest stages, preventing minor surface issues from escalating into significant structural damage.
The core principle of cement tank preservation is not fighting rust after it appears, but consistently maintaining the conditions that prevent it from starting. This involves managing moisture and ensuring the integrity of the tank's protective paint barrier.

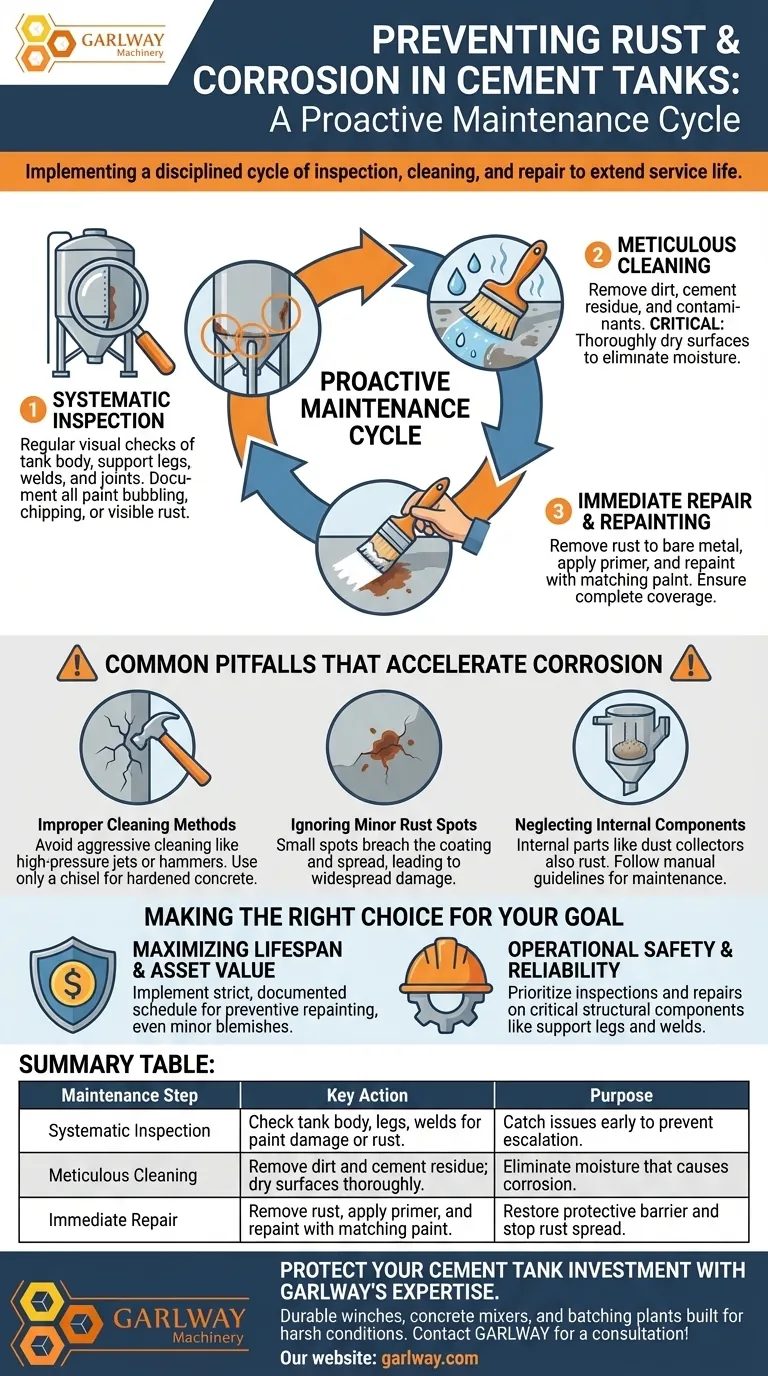
The Foundation: A Proactive Maintenance Cycle
Effective corrosion prevention is a continuous process, not a one-time task. Structuring your maintenance around a clear, repeatable cycle ensures nothing is overlooked and extends the tank's service life significantly.
Step 1: Systematic Inspection
Regular visual inspection is your first line of defense. Catching potential issues early is the most cost-effective way to manage corrosion.
Your team should conduct frequent checks of the entire tank structure, paying close attention to the tank body, support legs, welds, and joints. These are common areas where moisture can collect and rust can begin.
Document any signs of paint bubbling, chipping, or visible rust, no matter how small. This creates a maintenance log that helps track problem areas over time.
Step 2: Meticulous Cleaning
Dirt, cement residue, and other contaminants trap moisture against the tank's surface, creating a perfect environment for corrosion to develop.
Ensure the tank is cleaned regularly, both inside and out. After cleaning, it is critical to thoroughly dry the surfaces to eliminate the moisture that fuels the rusting process.
For internal cleaning, follow the manufacturer's manual, especially for components like the dust collector and arch-breaking device.
Step 3: Immediate Repair and Repainting
When you find a rusted area during an inspection, you must address it promptly.
First, carefully remove the existing rust and any loose paint from the affected area. The goal is to get back to a clean, stable metal surface.
Next, apply a suitable primer and then repaint the area. Be sure to match the original paint color and type to ensure a consistent protective barrier. Use brushes to ensure complete coverage in corners and on complex shapes.
Common Pitfalls That Accelerate Corrosion
Even with a plan in place, common mistakes can undermine your efforts and lead to premature failure of the tank's structure.
Using Improper Cleaning Methods
Aggressive cleaning can do more harm than good. Using excessive force, such as high-pressure jets aimed at weak points, can damage the paint and create entry points for moisture.
It is strictly prohibited to use a hammer to remove hardened concrete from inside the tank. This can deform the tank walls and fracture the protective coating. Only use a chisel for such tasks.
Ignoring Minor Rust Spots
A small spot of rust may seem insignificant, but it is a breach in the tank's protective coating. Left untreated, this small spot will spread under the surrounding paint, leading to widespread corrosion that is much more difficult and costly to repair.
Neglecting Internal Components
Corrosion is not just an external threat. Internal components can also rust, impacting the tank's performance and safety. Adhere to the manual's guidelines for maintaining internal devices to ensure they remain in optimal condition.
Making the Right Choice for Your Goal
Your maintenance strategy should align with your primary operational objectives.
- If your primary focus is maximizing lifespan and asset value: Implement a strict, documented schedule of inspection and preventive repainting, even for minor blemishes.
- If your primary focus is operational safety and reliability: Prioritize inspections and repairs on critical structural components like support legs, mounting points, and welds.
Ultimately, consistent and detail-oriented maintenance is the key to protecting your investment and ensuring safe, reliable operation.
Summary Table:
| Maintenance Step | Key Action | Purpose |
|---|---|---|
| Systematic Inspection | Check tank body, legs, welds for paint damage or rust. | Catch issues early to prevent escalation. |
| Meticulous Cleaning | Remove dirt and cement residue; dry surfaces thoroughly. | Eliminate moisture that causes corrosion. |
| Immediate Repair | Remove rust, apply primer, and repaint with matching paint. | Restore protective barrier and stop rust spread. |
Protect your cement tank investment with GARLWAY's expertise. As a specialist in construction machinery, we provide durable winches, concrete mixers, and batching plants trusted by contractors globally. Our solutions are built to withstand harsh conditions, ensuring your equipment remains corrosion-free and operational. Contact GARLWAY today for a consultation on reliable, long-lasting machinery tailored to your project needs!
Visual Guide
Related Products
- HZS35 Small Cement Concrete Mixing Batch Plant
- HZS120 Ready Mix Concrete Batching Plant Commercial Mud Cement Mixer
- HZS180 Ready Mix Concrete Plant for Foundations with Sand and Cement
- Mini Cement Mortar Mixer Truck for Construction
- HZS75 Concrete Batching Plant Cement Mixer Price Concrete Mixer Bunnings Mixing Plant
People Also Ask
- What are the two main categories of concrete batching plants? Choose the Right Plant for Your Project
- What are the advantages and disadvantages of concrete batching plants? Maximize Quality & Efficiency
- Why is proper maintenance important for a concrete batch mix plant? Maximize Uptime & Profitability
- What is the role of a concrete batching plant in the construction industry? Achieve Quality, Speed, and Cost Control
- What precautions should be taken before operating the concrete mixing station in winter? Ensure Safe & Efficient Production


