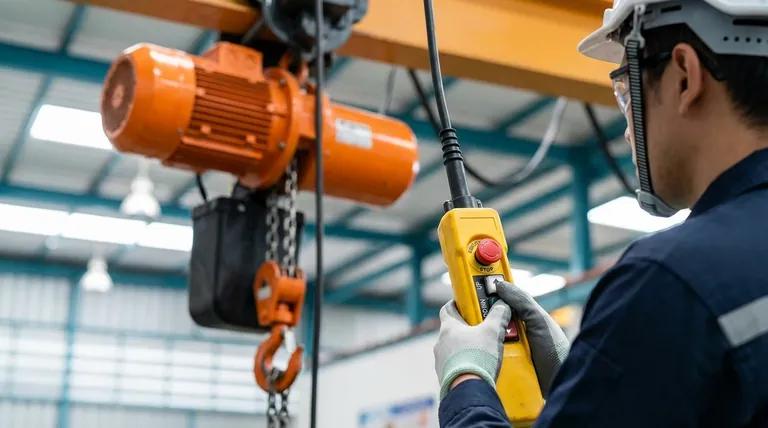
Before any operation, you must perform a series of brief but critical tests on the hoist's controls. This involves a no-load functional check of all directional movements (up, down, travel), a physical test of the emergency stop button and any limit switches, and a quick visual inspection of the control pendant, wiring, and connectors for any signs of damage.
The core purpose of pre-operation control tests is not just to see if the hoist moves, but to confirm that you have absolute and immediate command over its every function—especially its ability to stop—before a load is ever attached.
The Two Pillars of Control Inspection
A thorough pre-use check is built on two distinct but equally important activities: a physical inspection of the control hardware and a functional test of its operation.
Physical Inspection: The First Line of Defense
Before you even power on the hoist, conduct a quick visual and tactile check of the control unit.
Look for any cracks in the casing of the pendant or remote. Ensure all wiring entering and exiting the controller is secure, with no exposed or frayed wires.
Finally, confirm all control buttons are clearly labeled, move freely without sticking, and that the emergency stop is unobstructed and easily identifiable.
Functional Testing: Confirming Command
This is where you verify that every control input produces the correct and expected mechanical response from the hoist. This must always be performed without a load attached to the hook.
Executing the No-Load Functional Test
Follow this systematic process every day before the first lift. This sequence ensures that the most critical safety functions are verified before basic operational movements are confirmed.
Step 1: Locate and Verify Safety Cutoffs
Before initiating any movement, physically locate and identify all emergency stop buttons or kill switches. An operator must know how to cease all hoist functions instantly.
Press the emergency stop to ensure it de-energizes the control circuit. You should not be able to operate the hoist until the E-stop is reset.
Step 2: Test the Primary Brake Function
Briefly raise the empty hook a short distance and then stop. The hoist should stop immediately with no coasting or downward "drifting."
Any hesitation or slippage indicates a potential brake malfunction that must be addressed before use.
Step 3: Check Directional Controls
Test all directional buttons on the controller (UP, DOWN, and travel directions like EAST/WEST if applicable).
Ensure each button moves the hoist smoothly and only in the intended direction. Listen for any abnormal grinding, clicking, or squealing sounds, as these can indicate a developing mechanical or electrical issue.
Step 4: Confirm the Upper Limit Switch
If the hoist is equipped with an upper limit switch (a critical safety device), test it by carefully running the hook block up until it engages the switch.
The hoist's upward motion must stop automatically. This test prevents catastrophic "two-blocking," where the hook block collides with the hoist body.
Common Pitfalls to Avoid
Understanding the purpose behind these tests helps avoid dangerous assumptions and shortcuts.
Mistaking a No-Load Test for a Load Test
The daily no-load test confirms functionality. It does not certify the hoist's lifting capacity.
A formal load test is a separate procedure performed after installation or major repairs to verify the hoist can handle its rated load.
Ignoring Sluggish or Inconsistent Controls
Do not dismiss minor delays or hesitation in the hoist's response. These are often early warning signs of failing relays, contactors, or other internal control components.
What seems like a minor annoyance can quickly become a complete loss of control under load.
Overlooking Physical Damage
A cracked pendant casing or a frayed control cable is an immediate out-of-service condition, even if the buttons appear to work.
Damage compromises the unit's electrical safety and weather resistance, creating a significant risk of control failure or electric shock.
Making the Right Choice for Your Goal
Integrate these tests into your daily routine based on your primary responsibility.
- If your primary focus is daily operator safety: The functional no-load test, especially verifying the emergency stop and brake, is your most critical daily habit.
- If your primary focus is maintenance and reliability: Documenting any unusual sounds, hesitation, or sluggishness during these checks is essential for preventing major failures.
- If your primary focus is site compliance: Ensure all operators are formally trained not just on using the hoist, but on how to perform and document these specific pre-use control inspections.
Performing these quick, methodical checks is the foundation of every safe and efficient lifting operation.
Summary Table:
| Test Category | Key Checks | Purpose |
|---|---|---|
| Physical Inspection | Check pendant/remote casing, wiring, connectors, and E-stop button for damage. | Identify physical hazards and ensure control unit integrity. |
| Functional Test (No-Load) | Verify E-stop, test primary brake, check directional controls, confirm upper limit switch. | Confirm immediate and correct response to all operator commands. |
| Common Pitfalls | Mistaking functional test for load test, ignoring sluggish controls, overlooking physical damage. | Avoid dangerous assumptions and prevent potential failures. |
Ensure your lifting operations are safe and efficient with GARLWAY.
As a specialist in construction machinery, GARLWAY provides reliable winches and hoists designed for the demanding needs of construction companies and contractors worldwide. Our equipment is built to deliver the precise control and safety you require for daily operations.
Let our experts help you select the right hoist for your project and provide guidance on proper maintenance and inspection protocols.
Contact GARLWAY today to discuss your lifting needs and enhance your site's safety standards!
Visual Guide

Related Products
- Electric Hoist Winch Boat Anchor Windlass for Marine Applications
- Electric and Hydraulic Winch for Heavy Duty Applications
- Hydraulic Winding Engine Harbor Freight Winch
- Portable Cement Mixer with Lift Concrete Machine
- 12000 lb Electric Boat Trailer Winch with Windlass Anchor Warn
People Also Ask
- What is the general user satisfaction with boat anchor winches? A Game-Changer for Boaters
- What are the advantages of a windlass type anchor winch? Achieve Precise, Rapid Anchoring for Your Vessel
- What is the difference in efficiency between single-drum and double-drum electric hoists?
- What are the differences in lifting height between single-drum and double-drum electric hoists? Choose the Right Hoist for Your Project's Height Needs
- What are the advantages of installing an electric anchor winch on a boat? Boost Safety & Ease for Boaters