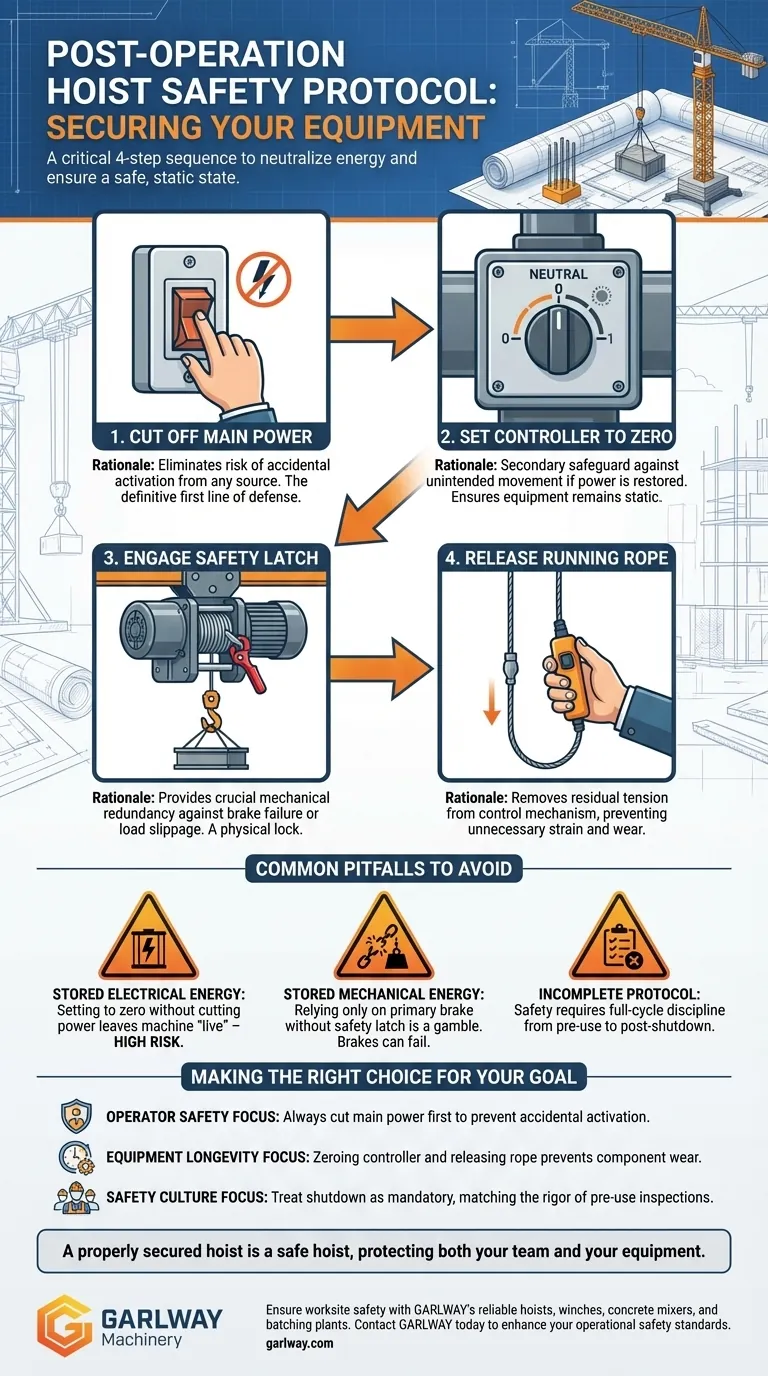
Securing a hoist after operation is a critical safety protocol. The correct procedure involves four distinct steps: cutting off the main power supply, setting the controller to the zero position, engaging the safety latch to secure the brake, and finally, releasing the running rope to remove any residual tension.
The procedure after stopping a hoist isn't just about shutting it down. It's a deliberate process to neutralize all potential energy sources—electrical and mechanical—ensuring the equipment is in a safe, static state for everyone in the vicinity.

The Rationale Behind Each Shutdown Step
Each step in the shutdown sequence is designed to mitigate a specific type of risk. Following this procedure methodically transitions the equipment from an active operational state to a completely safe and inert one.
Step 1: Cut Off the Main Power
This is the most critical action. Disconnecting the hoist from its power source eliminates the risk of accidental activation, which could be caused by a faulty controller, an inadvertent bump of the controls, or an unexpected power surge.
This step ensures that no electrical energy can reach the motor, making it the definitive first line of defense against unintended movement.
Step 2: Set the Controller to Zero
Setting the controller to its neutral or "zero" position is a vital secondary electrical safeguard.
Should the power be restored accidentally, a zeroed-out controller prevents the hoist from lurching into motion immediately. It ensures the machine remains in a neutral state until an operator makes a conscious decision to act.
Step 3: Secure the Brake with the Safety Latch
This step addresses the mechanical energy stored in a suspended load. While the primary brake holds the load, the safety latch acts as a physical lock.
Engaging this latch provides a crucial layer of redundancy, preventing catastrophic failure or load slippage in the event the primary braking mechanism fails.
Step 4: Release the Running Rope
Releasing the running rope, often part of the control pendant, removes any remaining tension from the control mechanism itself.
This prevents unnecessary strain and wear on control components while the hoist is idle, contributing to the equipment's overall longevity and reliability.
Common Pitfalls to Avoid
Failing to follow a consistent shutdown protocol introduces significant and unnecessary risk. The steps are not optional; they are an integrated safety system.
The Risk of Stored Electrical Energy
Simply setting the controller to zero without cutting the main power leaves the machine "live." This creates a hazardous environment for anyone performing maintenance and leaves the hoist vulnerable to electrical faults that could bypass the controller.
The Risk of Stored Mechanical Energy
Relying solely on the primary brake without engaging the safety latch is a gamble. Brakes can fail due to wear, hydraulic leaks, or contamination. The safety latch is the essential backup that holds the load securely when the primary system is compromised.
The Importance of a Full-Cycle Protocol
Safety is not isolated to a single action. The diligence applied during pre-use inspections, such as checking chain links and performing load tests, must be matched by the discipline used during the post-use shutdown procedure.
Making the Right Choice for Your Goal
Integrating this procedure into your daily workflow is fundamental for safe and efficient operations.
- If your primary focus is operator safety: The non-negotiable first step is always to completely disconnect the main power source to prevent accidental activation.
- If your primary focus is equipment longevity: Returning the controller to zero and securing the brake prevents unnecessary wear and strain on critical electrical and mechanical components.
- If your primary focus is creating a workplace safety culture: Treat the shutdown procedure with the same rigor as pre-use inspections, making it a mandatory and consistent final step for every operation.
A properly secured hoist is a safe hoist, protecting both your team and your equipment.
Summary Table:
| Step | Action | Purpose |
|---|---|---|
| 1 | Cut Off Main Power | Eliminates risk of accidental electrical activation |
| 2 | Set Controller to Zero | Provides secondary safeguard against unintended movement |
| 3 | Engage Safety Latch | Secures brake with physical redundancy against load slippage |
| 4 | Release Running Rope | Removes residual tension, prevents component strain |
Ensure your worksite safety with GARLWAY's reliable hoists and construction machinery. As specialists in winches, concrete mixers, and batching plants for construction companies and contractors globally, we provide equipment built with safety-first design. Our products help you implement proper shutdown protocols effortlessly. Contact GARLWAY today to discuss your machinery needs and enhance your operational safety standards.
Visual Guide
Related Products
- Electric Hoist Winch Boat Anchor Windlass for Marine Applications
- Electric and Hydraulic Winch for Heavy Duty Applications
- Hydraulic Winding Engine Harbor Freight Winch
People Also Ask
- What are the differences in lifting height between single-drum and double-drum electric hoists? Choose the Right Hoist for Your Project's Height Needs
- What are the operational differences between electric hoists and winches? A Guide to Safe Lifting vs. Pulling
- What are the advantages of installing an electric anchor winch on a boat? Boost Safety & Ease for Boaters
- What is the difference in efficiency between single-drum and double-drum electric hoists?
- What are the key considerations for installing a windlass type anchor winch? Ensure a Flawless Gravity-Feed System