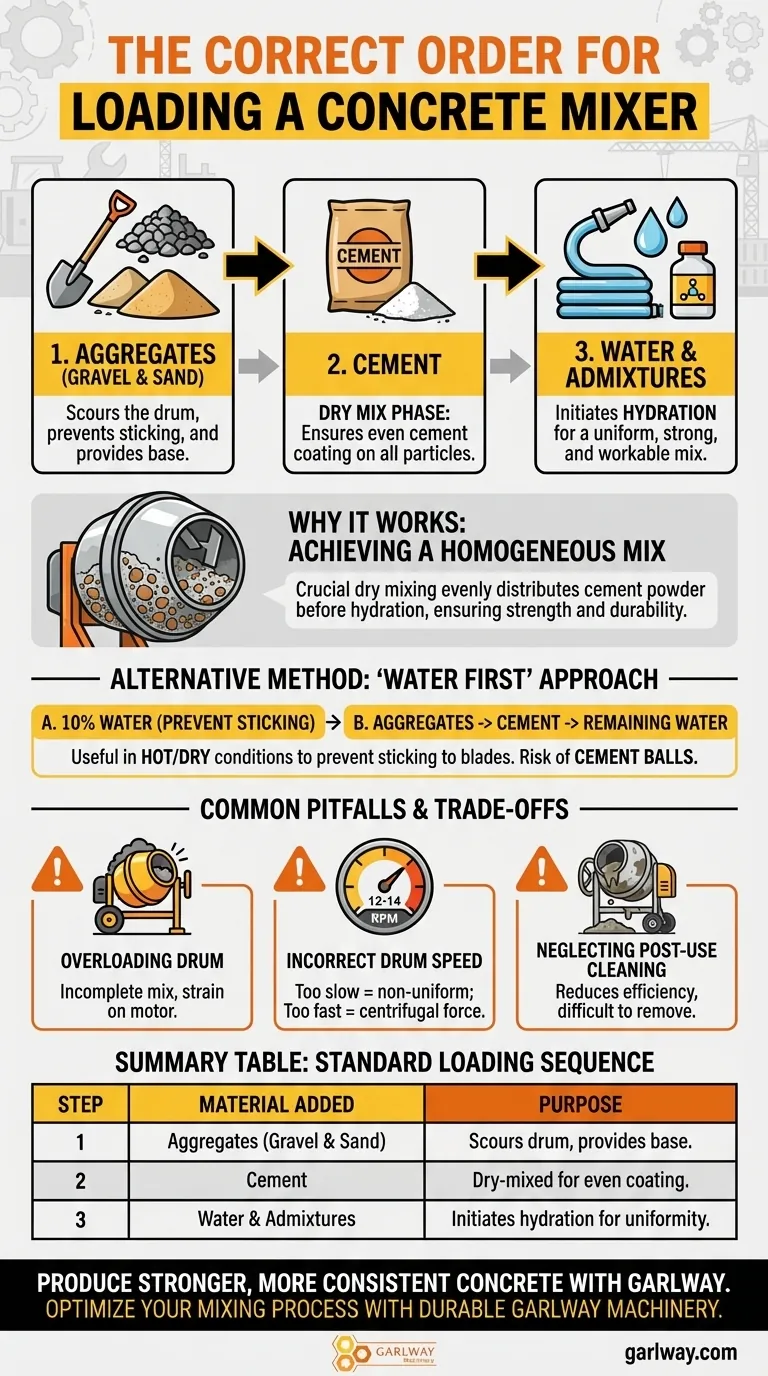
The standard and most reliable order for loading a concrete mixer is to first add the aggregates (sand and gravel), followed by the cement. These components are briefly mixed dry before water and any chemical admixtures are introduced for the final mixing phase. This sequence is designed to ensure the cement powder thoroughly coats the aggregates before hydration begins.
The specific order of materials is not a trivial step; it is a fundamental technique designed to prevent cement clumping and ensure a uniform, high-strength concrete by promoting a complete coating of all aggregate particles.
The Principle Behind the Process: Achieving a Homogeneous Mix
The ultimate goal of mixing concrete is to create a homogeneous mixture where every particle of sand and gravel is completely coated in cement paste. This uniform distribution is the key to strength, durability, and workability. The loading sequence is engineered to achieve this result reliably.
Why Start with Aggregates?
The first materials in the drum should be the aggregates—typically the coarse gravel first, followed by the sand.
Adding these heavier, abrasive components first helps to scour the inside of the drum, cleaning it of any hardened residue from previous batches and preventing new material from sticking.
The Critical Step: Dry Mixing
After the aggregates are in, the cement is added. The mixer is then allowed to turn for a few moments before any water is added.
This dry mixing stage is crucial. It uses the tumbling action of the aggregates to evenly distribute the fine cement powder, ensuring it coats the surface of every piece of sand and gravel.
The Final Step: Introducing Water
Once the dry components are well-mixed, about half to two-thirds of the required water is added. The mixer continues to turn, allowing the chemical reaction of hydration to begin uniformly throughout the batch.
The remaining water, along with any liquid admixtures (like water-reducers or accelerators), is then added gradually until the desired consistency is reached.
An Alternative Method: The "Water First" Approach
You may encounter advice to add a small amount of water to the mixer first, before any dry ingredients.
When This Method is Used
Adding about 10% of the water first can prevent dry powders from sticking to the drum blades, especially in very dry or hot conditions. The rest of the materials are then added in the standard sequence: aggregates, cement, and then the remaining water.
Potential Downsides
The primary risk of adding water too early, or adding it right after the cement, is the formation of cement balls. These are clumps of hardened cement that have not been properly mixed, creating weak spots in the final concrete structure. The aggregate-first method significantly reduces this risk.
Understanding the Trade-offs and Common Pitfalls
Proper loading is about more than just the order of materials. How you operate the equipment directly impacts the quality of your mix and the longevity of the machine.
The Problem of Overloading
Never exceed the manufacturer's recommended batch capacity. Overloading the drum prevents the materials from tumbling freely, resulting in an incomplete and inconsistent mix. It also puts excessive strain on the mixer's motor and drivetrain.
Incorrect Drum Speed
The drum should rotate at the speed specified by the manufacturer, typically between 12-14 revolutions per minute (rpm). If the speed is too slow, the mix won't be uniform. If it's too fast, centrifugal force will cause the materials to stick to the side of the drum instead of mixing properly.
Neglecting Post-Use Cleaning
Immediately after discharging the final batch, you must clean the mixer thoroughly. Any concrete left to harden inside the drum will be extremely difficult to remove and will reduce the mixer's efficiency on future jobs.
Making the Right Choice for Your Goal
- If your primary focus is maximum strength and consistency: Strictly adhere to the aggregate-first, dry-mix method. This is the most reliable way to ensure a high-quality, homogeneous mix every time.
- If your primary focus is preventing material from sticking in a hot/dry climate: Consider adding a small portion of the water first, but immediately follow with all the aggregates to ensure proper scouring and mixing.
- If your primary focus is equipment longevity and safety: Always operate within the mixer's stated capacity, maintain the correct drum speed, and prioritize thorough cleaning after every use.
Mastering this simple loading procedure is the first and most critical step toward producing predictable, professional-grade concrete.
Summary Table:
| Step | Material Added | Purpose |
|---|---|---|
| 1 | Aggregates (Gravel & Sand) | Scours the drum and provides a base for cement coating. |
| 2 | Cement | Dry-mixed with aggregates to ensure even distribution. |
| 3 | Water & Admixtures | Initiates hydration for a uniform, workable mix. |
Produce stronger, more consistent concrete with the right equipment. GARLWAY specializes in durable and efficient construction machinery, including concrete mixers and batching plants designed for contractors and construction companies worldwide. Let our expertise help you optimize your mixing process. Contact our team today to find the perfect solution for your project needs!
Visual Guide
Related Products
- Portable Concrete Mixer Machine Equipment for Mixing Concrete
- Construction Products Concrete Plant Machine Mixing Concrete Mixer
- Portable Electric Concrete Mixer Machine for Cement Mixing
- JZC400 Mobile Small Concrete Mixer Cement Mixer Machine
- Hydraulic Concrete Mixer Machine Cement Mixing Equipment for Mixture Concrete
People Also Ask
- What is the capacity of a typical portable concrete mixer? The 140L Standard for Small-Scale Projects
- What are the advantages of a portable concrete mixer? Boost Efficiency & Save Costs on Small Jobs
- How much concrete can you pour with a portable mixer? Find the Perfect Fit for Your Project
- How much does a portable concrete mixer hold? A Guide to Choosing the Right Capacity
- Why is it necessary to use a portable concrete mixer? Gain Total Control & Efficiency


