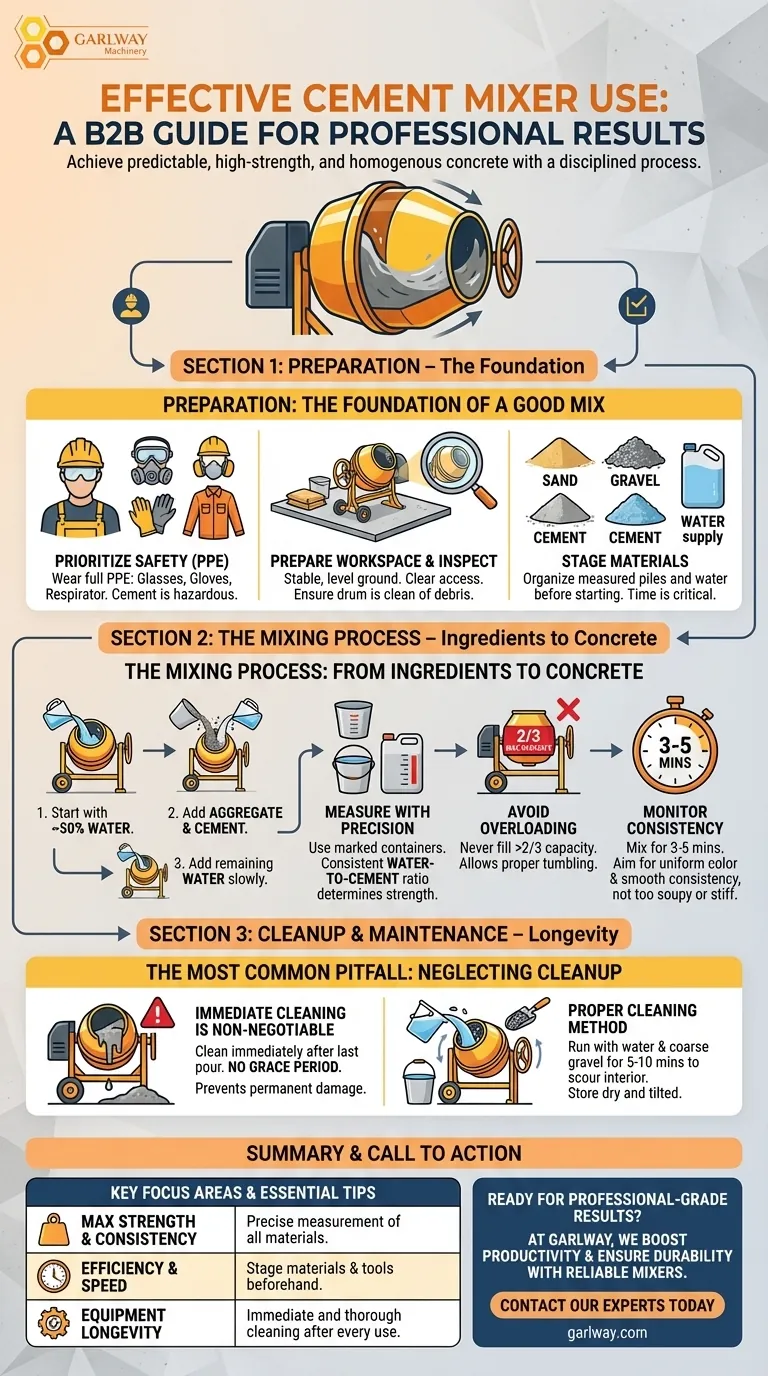
Using a cement mixer effectively is about more than just automation; it requires a disciplined process. The keys are to measure your materials precisely, add about half the water to the drum first, avoid overfilling, mix until you achieve a uniform consistency, and clean the machine immediately after you finish your pour.
A cement mixer’s primary advantage isn't just saving your back; it’s about producing a predictable, high-strength, and homogenous concrete batch every single time. This consistency is achieved not by the machine itself, but by the operator's methodical approach to preparation, loading, and cleanup.
Preparation: The Foundation of a Good Mix
Before you even think about adding materials, a few minutes of preparation will prevent the most common problems, ensure safety, and lead to a much better result.
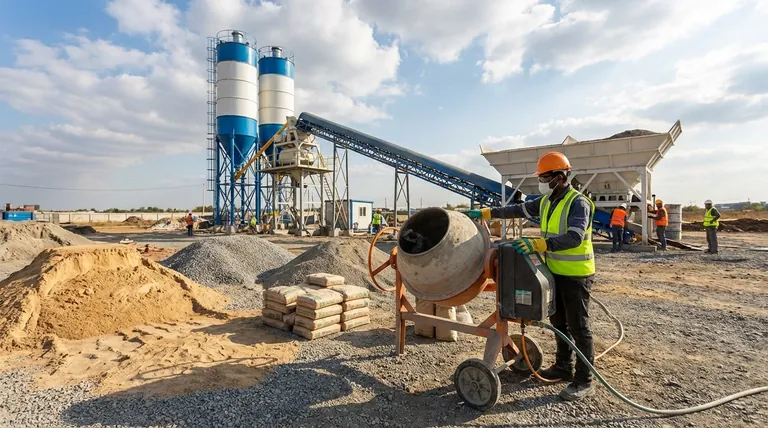
Prioritize Personal Safety
Concrete contains cement, which is highly alkaline and can cause skin burns and irritation. Inhaling cement dust can also lead to respiratory issues.
Always wear appropriate Personal Protective Equipment (PPE), including safety glasses, waterproof gloves, long sleeves, and a respirator or dust mask.
Prepare Your Workspace
A mixer can become unstable on uneven ground, creating a safety hazard and making it difficult to pour accurately.
Position your mixer on a stable, level surface in a well-ventilated area. Ensure you have clear access for your wheelbarrow and that all your materials are within easy reach.
Inspect Your Equipment
Hardened concrete from a previous job will break off into your new batch, creating weak spots and compromising the mix.
Before starting, check that the inside of the drum is clean and free of caked-on cement or debris.
Stage Your Materials
The mixing process is time-sensitive once water is introduced. Scrambling for a bag of cement or a water hose mid-mix leads to mistakes.
Have your measured piles of aggregate (sand and gravel), bags of cement, and a ready water supply organized next to your mixer before you begin.
The Mixing Process: From Ingredients to Concrete
The actual mixing is a sequence of simple steps where the order and proportions are critical to the final quality of the concrete.
The Critical Loading Sequence
If you add cement first, it can stick to the back of the dry drum, forming clumps that will not mix properly.
Always start by adding about half of your required water into the spinning drum. Then, gradually add your aggregate and cement. Add the remaining water slowly until you reach the desired consistency.
Measure with Precision
The strength of your concrete is determined by the water-to-cement ratio. Inconsistent shovelfuls or guessing on quantities will result in a weak and unreliable final product.
Use buckets or marked containers to measure your sand, gravel, and cement accurately for each batch to ensure consistency.
Avoid Overloading the Drum
Overfilling a mixer prevents the materials from tumbling correctly, resulting in an uneven, poorly mixed batch. It also puts significant strain on the motor.
Never fill the mixer more than two-thirds of its stated capacity. This leaves enough room for the materials to cascade and blend thoroughly.
Monitor for Consistency
Under-mixing leaves unhydrated cement and poorly distributed aggregate, while over-mixing can begin to break down the aggregate.
Let the mixer run for 3-5 minutes after all ingredients are added. The ideal mix should be uniform in color and consistency, moving smoothly inside the drum without being too soupy or too stiff.
The Most Common Pitfall: Neglecting Cleanup
The single most common mistake users make is delaying or skipping the cleanup process. This is the fastest way to ruin your equipment and compromise future projects.
Why Immediate Cleaning is Non-Negotiable
Cement begins to harden almost immediately. Concrete left to dry inside the drum is extremely difficult to remove and will permanently reduce your mixer's capacity and effectiveness.
You must clean the mixer immediately after pouring your last batch. There is no grace period.
The Proper Cleaning Method
A simple rinse is often not enough to remove all the cement slurry that coats the inside of the drum.
Add a few buckets of clean water and a shovel full of coarse gravel into the drum. Let it run for 5-10 minutes. The gravel acts as a scouring agent, scrubbing the interior clean.
Store for Longevity
Exposure to rain and moisture can rust the motor and drum, shortening the life of your mixer.
After cleaning, dump the slurry, give it a final rinse, and store the mixer in a dry, covered location, tilting the drum downwards to prevent water from pooling inside.
Making the Right Choice for Your Goal
Your primary goal for the project dictates which part of this process you should focus on the most.
- If your primary focus is Maximum Strength & Consistency: Precise measurement of your water, cement, and aggregates is the most critical factor.
- If your primary focus is Efficiency & Speed: Staging all your materials and tools beforehand is the single biggest time-saver.
- If your primary focus is Equipment Longevity: Immediate and thorough cleaning after every single use is the only way to protect your investment.
By following these disciplined steps, you transform the cement mixer from a simple labor-saving device into a reliable asset for producing professional-quality concrete.
Summary Table:
| Key Focus Area | Essential Tip | Why It Matters |
|---|---|---|
| Preparation | Stage materials, wear PPE, and inspect the drum. | Prevents accidents and ensures a consistent mix from the start. |
| Mixing Process | Add half the water first, measure precisely, don't overload. | Guarantees a homogenous, high-strength concrete batch. |
| Cleanup | Clean immediately with water and gravel after use. | Protects your investment by preventing concrete from hardening in the drum. |
Ready to achieve professional-grade concrete results with a reliable mixer?
At GARLWAY, we specialize in durable and efficient construction machinery, including concrete mixers and batching plants designed for the demands of construction companies and contractors. Our equipment helps you:
- Boost Productivity: Mix consistent, high-quality batches faster.
- Ensure Durability: Built to withstand tough job site conditions.
- Simplify Your Workflow: User-friendly designs for effective operation.
Let us help you find the perfect mixer for your project needs. Contact our experts today for a personalized consultation!
Visual Guide
Related Products
- HZS25 Best Cement Mixer for Quick Mix Concrete at Bunnings
- JDC350 Small Cement Concrete Mortar Mixer
- JW1000 Mobile Cement Mixer Concrete Mixer Truck and Batching Plant
- JZC400 Mobile Small Concrete Mixer Cement Mixer Machine
- Concrete Cement Mixer Machine Drum Mixer for Construction
People Also Ask
- What are the key benefits of using a cement mixer on a construction site? Boost Efficiency, Quality & Safety
- How do cement mixers enhance safety on construction sites? Reduce Strain, Hazards, and Accidents
- What factors should be considered when choosing a cement mixer? Select the Right Mixer for Efficiency and Durability
- Why is it important to clean the cement mixer after use? Prevent Costly Damage and Ensure Quality Concrete
- How does the mixing process in a cement mixer work? Achieve Perfect Concrete Every Time


