To make homemade potting soil in a concrete mixer, you simply add your pre-measured ingredients, run the mixer for about five minutes, and then unload your perfectly blended mix. The mixer's turning action and internal paddles are exceptionally effective at breaking up clumps and ensuring every component is evenly distributed, creating a professional-grade medium with minimal physical effort.
Using a concrete mixer transforms potting soil production from a labor-intensive chore into a fast, consistent, and scalable process. It allows you to create large volumes of superior-quality growing medium customized to your exact needs.

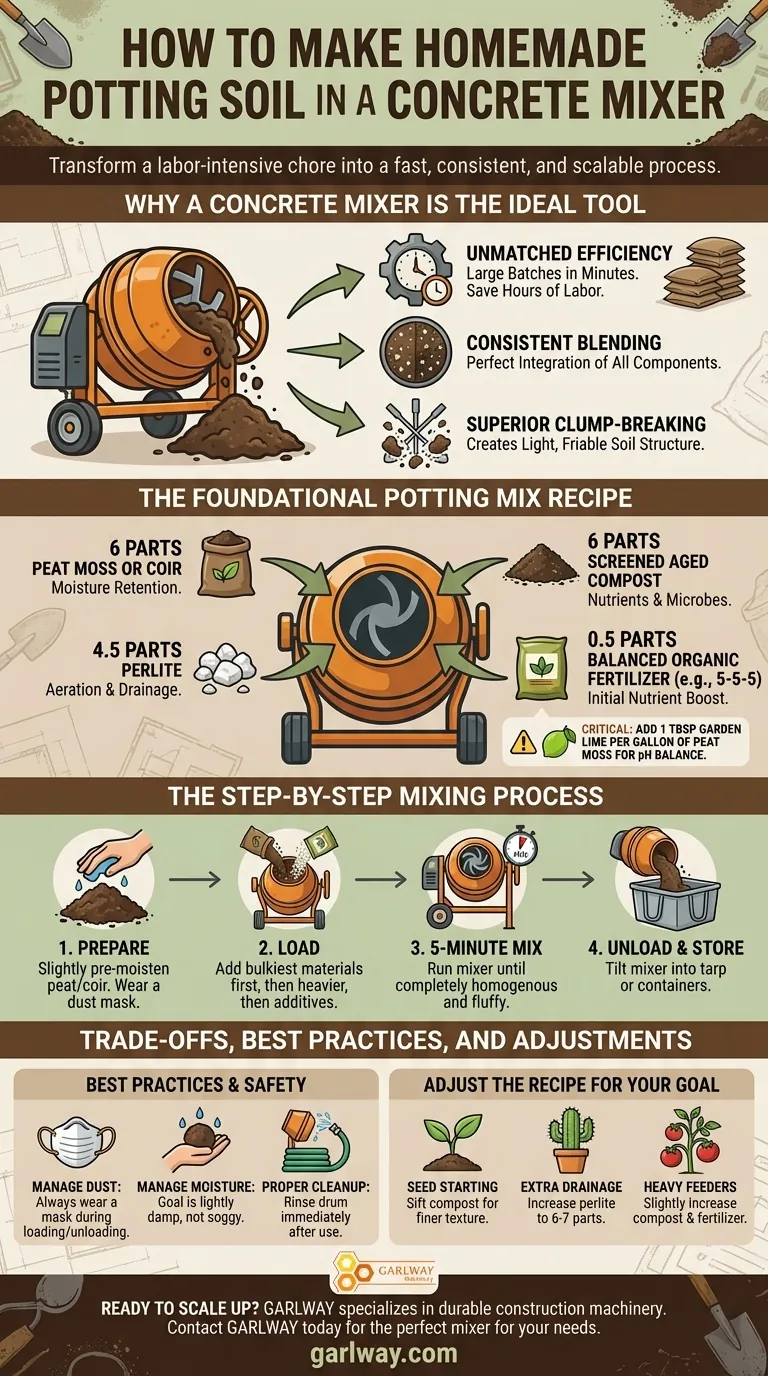
Why a Concrete Mixer is the Ideal Tool
While a wheelbarrow and shovel can work for small quantities, a concrete mixer offers distinct advantages for any serious gardener. The efficiency and quality of the final product are unmatched by manual methods.
Unmatched Efficiency for Large Batches
The primary benefit is speed and volume. A standard contractor-grade mixer can produce dozens of gallons of potting soil in a single five-minute run, a task that could take an hour of strenuous manual labor.
Consistent, Uniform Blending
The continuous tumbling action ensures that lighter materials like perlite and finer components like fertilizer are perfectly integrated. This uniformity is critical for consistent plant growth, as it prevents pockets of dryness or concentrated nutrients.
Superior Clump-Breaking Action
Ingredients like peat moss or compost are often clumpy and compressed. The mixer's internal paddles are designed to break apart these clumps, resulting in a light, friable soil structure that is essential for healthy root development.
The Foundational Potting Mix Recipe
This general-purpose recipe is an excellent starting point for a wide variety of plants, from vegetables to annual flowers. It balances moisture retention, aeration, and nutrition.
Step 1: Gather Your Core Components
The formula is based on "parts," which can be any unit of volume you choose (a 1-gallon bucket, a 5-gallon bucket, etc.).
- 6 parts Peat Moss or Coconut Coir
- 6 parts Screened Aged Compost
- 4.5 parts Perlite
- 0.5 parts Balanced Organic Fertilizer (e.g., 5-5-5)
Step 2: Understand the "Why" Behind Each Ingredient
Each component serves a specific and vital function in the final mix.
- Peat Moss/Coir: This is the base of your mix. It acts like a sponge, providing crucial moisture retention for the plant's roots.
- Compost: This is the primary source of slow-release nutrients and beneficial microbes. Using screened, aged compost ensures a fine texture free of large debris.
- Perlite: These small, white volcanic rocks are extremely lightweight and porous. They create air pockets in the soil, providing essential aeration and drainage to prevent root rot.
- Fertilizer: This gives your plants an initial nutritional boost to support early growth.
Step 3: The Critical Role of pH Balance
If you are using peat moss, which is naturally acidic, you must add a buffering agent. This is non-negotiable for the health of most plants.
Add 1 tablespoon of garden lime for every gallon of peat moss used. This simple step will raise the pH of the mix into a more neutral range that allows for optimal nutrient uptake.
The Step-by-Step Mixing Process
Following a clear process will ensure safety, consistency, and easy cleanup.
Prepare Your Ingredients
Before adding it to the mixer, it's a good practice to slightly pre-moisten your peat moss or coir. A dry, dusty base can be hard to wet evenly later and creates unnecessary airborne particles.
Loading the Mixer
While the order is not critical, it's often easiest to add the bulkiest, lightest materials first, like the peat moss and perlite. Then, add the heavier compost and finally the fertilizer and lime.
The 5-Minute Mix
Turn on the mixer and let it run for approximately five minutes. This is generally all that is needed to achieve a completely homogenous, fluffy mixture. Over-mixing is not a concern.
Unloading and Storage
Tilt the mixer to pour the finished soil onto a tarp or directly into storage containers like large totes or heavy-duty bags.
Understanding the Trade-offs and Best Practices
While highly effective, using a concrete mixer requires awareness of a few key considerations for safety and quality.
The Dust Factor
Mixing dry ingredients like perlite and peat moss will create significant dust. Always wear a dust mask to protect your lungs during the loading and unloading process.
Managing Moisture Levels
Your goal is to create a lightly damp, not a soggy, mix. It's much easier to add water to your containers after planting than it is to dry out a waterlogged batch of soil. Only add small amounts of water to the mixer if absolutely necessary to control dust.
Proper Cleanup and Maintenance
Clean the mixer drum immediately after use. A quick rinse with a hose will prevent caked-on residue that can be difficult to remove later and could contaminate future batches.
Making the Right Choice for Your Goal
You can easily adjust this foundational recipe to meet the specific needs of different plants.
- If your primary focus is starting seeds: Use this recipe but consider sifting your compost for an even finer texture that won't impede delicate seedlings.
- If your primary focus is for plants needing extra drainage (like succulents or rosemary): Increase the perlite portion from 4.5 parts to 6 or 7 parts to enhance water runoff.
- If your primary focus is for heavy-feeding plants (like tomatoes or peppers): You can slightly increase the compost and balanced fertilizer components to provide more sustained nutrition.
By taking control of your growing medium, you are setting the stage for healthier plants and a more productive garden.
Summary Table:
| Key Benefit | Description |
|---|---|
| Efficiency | Mix dozens of gallons in 5 minutes, saving hours of manual labor. |
| Uniform Blending | Tumbling action ensures even distribution of all components like perlite and fertilizer. |
| Clump Breaking | Internal paddles break up peat moss and compost for a light, friable soil structure. |
| Scalability | Easily produce large, consistent batches for any size garden or project. |
Ready to scale up your gardening or landscaping projects with professional-grade equipment?
GARLWAY specializes in durable, efficient construction machinery, including concrete mixers ideal for contractors, landscapers, and serious gardeners. Our mixers are built to handle demanding tasks like creating large volumes of custom potting soil, saving you time and labor while ensuring a superior, consistent product.
Contact GARLWAY today to find the perfect mixer for your needs and take your productivity to the next level.
Visual Guide
Related Products
- Portable Concrete Mixer Machine Equipment for Mixing Concrete
- Construction Products Concrete Plant Machine Mixing Concrete Mixer
- Portable Electric Concrete Mixer Machine for Cement Mixing
- JZC400 Mobile Small Concrete Mixer Cement Mixer Machine
- Hydraulic Concrete Mixer Machine Cement Mixing Equipment for Mixture Concrete
People Also Ask
- What is the capacity of a typical portable concrete mixer? The 140L Standard for Small-Scale Projects
- What are the benefits of portable concrete mixers? Achieve On-Site Mixing Flexibility & Control
- What are the options for mixing concrete at small construction sites? Choose the Best Method for Your Project
- What types of portable concrete mixers exist? Find the Perfect Mixer for Your Project
- Why is it necessary to use a portable concrete mixer? Gain Total Control & Efficiency


