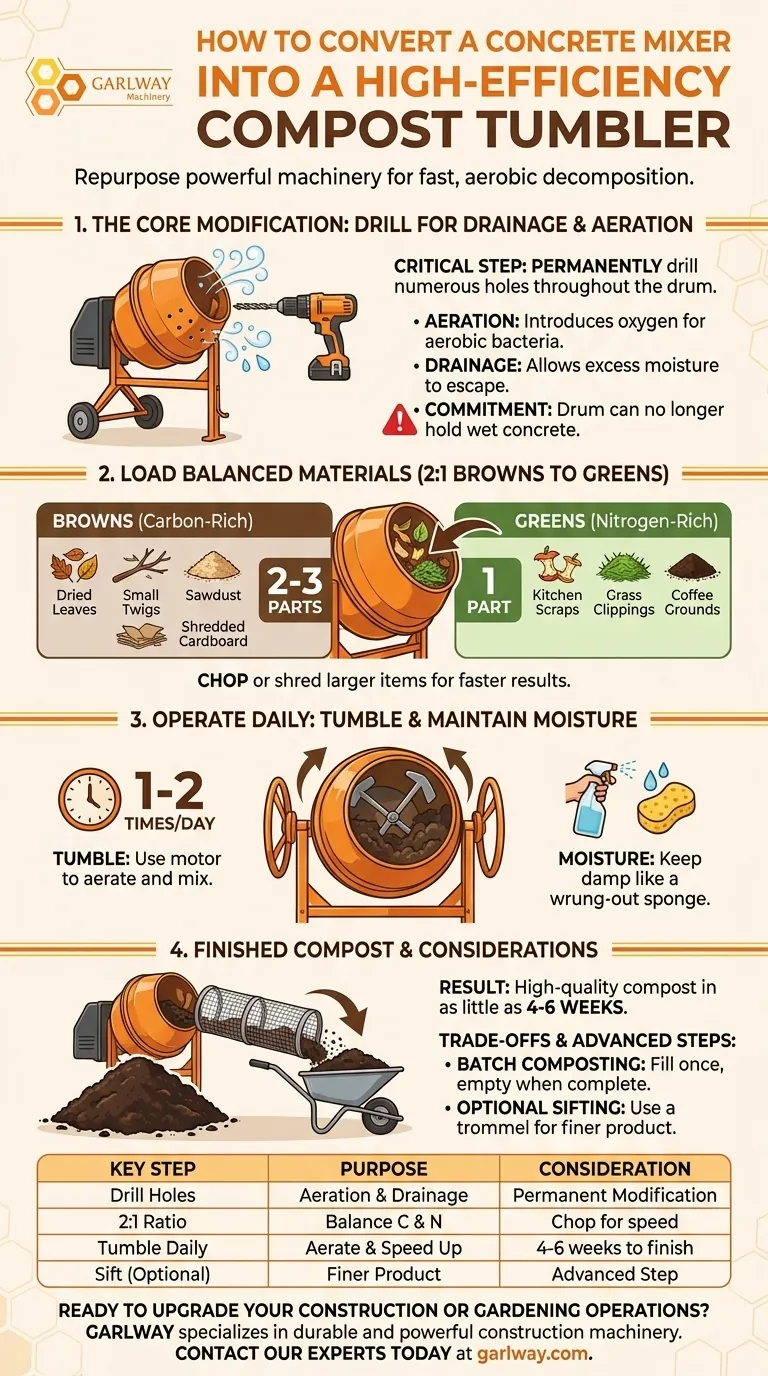
To convert a concrete mixer into a compost tumbler, you must first permanently modify its drum by drilling numerous holes for drainage and aeration. Once modified, you can load the drum with a balanced mix of green and brown compostable materials, lightly dampen the contents, and use the mixer's motor to rotate it a few times each day. This process leverages the mixer's power to efficiently aerate the materials, significantly speeding up decomposition.
The core principle is transforming a machine designed for simple mixing into one that facilitates aerobic decomposition. This requires a permanent modification—adding holes—to introduce oxygen and allow excess moisture to escape, two critical factors for creating high-quality compost quickly.
The Core Conversion: From Mixing Concrete to Aerating Compost
A concrete mixer's rotating drum and powerful motor make it an excellent foundation for a DIY compost tumbler. However, its original design is for containment, which is the opposite of what compost needs.
The Critical Modification: Drainage and Aeration
The single most important step is to drill holes throughout the mixer's drum. A healthy compost pile requires oxygen for aerobic bacteria to thrive; without it, the process becomes slow, smelly, and anaerobic.
These perforations serve two vital functions:
- Aeration: They allow air to flow into the mixture as it tumbles.
- Drainage: They permit excess moisture to escape, preventing the materials from becoming a waterlogged, compacted sludge.
Be aware that this modification is permanent. A drum with holes can no longer hold wet concrete, so you are committing the machine to its new purpose.
Optimizing the Mixing Paddles
Most concrete mixers have internal paddles designed to fold heavy material. These work perfectly for compost, ensuring that the entire batch is consistently lifted and mixed, preventing dense clumps and promoting uniform decomposition. No modification is needed here.
Operating Your New Compost Tumbler
Once converted, using the mixer is straightforward. The focus shifts from mechanical modification to managing the biological process of decomposition.
Loading the Right Materials
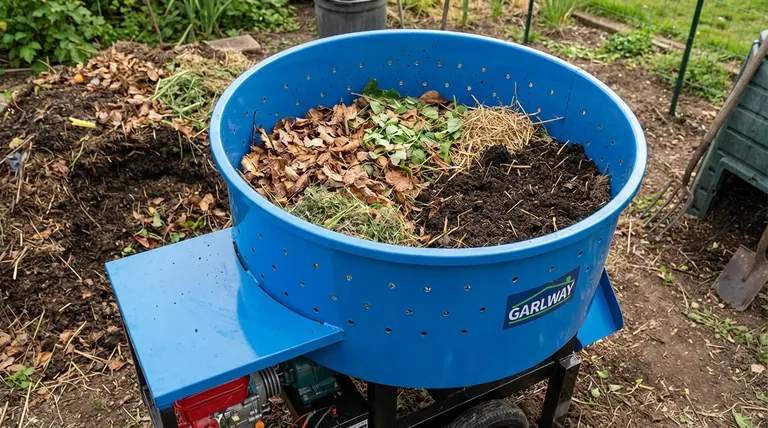
Effective composting depends on a good balance of carbon-rich "browns" and nitrogen-rich "greens."
- Browns (Carbon): Dried leaves, small twigs, sawdust, shredded cardboard, and straw.
- Greens (Nitrogen): Kitchen scraps (fruit and vegetable peels), grass clippings, and coffee grounds.
Aim for a ratio of roughly two to three parts brown material to one part green material by volume. Chop or shred larger items to increase surface area and speed up the process.
Maintaining Moisture Levels
Your compost mixture should be damp, like a wrung-out sponge, but not dripping wet. The drainage holes will help manage excess water from rain or overly wet green materials, but it's best to control moisture from the start.
The Turning Schedule
Use the motor to rotate the drum for a few minutes once or twice per day. This frequent turning is the primary advantage of this system. It re-introduces oxygen and ensures all materials come into contact with the active, hotter core of the pile.
Under ideal conditions with proper aeration and moisture, you can expect finished compost in as little as 4 to 6 weeks.
Understanding the Trade-offs
While effective, this DIY solution has practical limitations you must consider before drilling the first hole.
It's a Permanent Commitment
As stated before, modifying the drum renders the machine useless for concrete work. This conversion is only practical for a mixer that is old, unused, or can be dedicated solely to composting.
Managing Batch Composting
A tumbler is a batch composter. You fill it once, let the material decompose completely, and then empty it. You cannot continuously add new kitchen scraps as you would with a static pile. For continuous input, you would need multiple mixers or a separate holding bin for new materials.
Advanced Step: Sifting the Final Product
For a finer, more uniform final product, you can construct a sifting trommel that attaches to the mixer. This is typically a cylindrical cage made of steel mesh or a repurposed washing machine drum.
You attach the trommel so it rotates with the mixer. As you shovel finished compost in, the fine material falls through the mesh into a wheelbarrow below, while larger, unfinished pieces are retained and can be returned to the next compost batch.
Making the Right Choice for Your Goal
This project is an excellent way to create a high-performance composting system by repurposing existing equipment.
- If your primary focus is speed and efficiency: A converted mixer is ideal, as daily motorized turning drastically accelerates decomposition compared to a static pile.
- If your primary focus is repurposing an old or unused mixer: This is a perfect project that gives a powerful tool a new, sustainable purpose in your garden.
- If your primary focus is a low-effort, continuous system: A simple three-bin system or a static compost pile might be a better fit, as they allow for the constant addition of new materials without managing batches.
By modifying it for aeration and drainage, you can transform a machine designed for construction into a powerful tool for soil regeneration.
Summary Table:
| Key Step | Purpose | Consideration |
|---|---|---|
| Drill Holes in Drum | Enable aeration and drainage | This is a permanent modification |
| Use 2:1 Brown-to-Green Ratio | Balance carbon and nitrogen for decomposition | Chop materials for faster results |
| Tumble 1-2 Times Daily | Aerate the pile and speed up the process | Can produce compost in 4-6 weeks |
| Consider a Sifting Trommel | Create a finer, more uniform final product | An optional advanced step |
Ready to Upgrade Your Construction or Gardening Operations?
GARLWAY specializes in providing durable and powerful construction machinery, including concrete mixers, winches, and batching plants for contractors and construction companies worldwide. Whether you're building structures or looking for innovative ways to repurpose equipment, our solutions are engineered for performance and reliability.
Let us help you find the right machinery for your project needs. Contact our experts today to discuss your requirements and discover the GARLWAY advantage!
Visual Guide
Related Products
- Portable Concrete Mixer Machine Equipment for Mixing Concrete
- Construction Products Concrete Plant Machine Mixing Concrete Mixer
- Portable Electric Concrete Mixer Machine for Cement Mixing
- JZC400 Mobile Small Concrete Mixer Cement Mixer Machine
- Hydraulic Concrete Mixer Machine Cement Mixing Equipment for Mixture Concrete
People Also Ask
- What types of portable concrete mixers exist? Find the Perfect Mixer for Your Project
- Why is it necessary to use a portable concrete mixer? Gain Total Control & Efficiency
- What are the benefits of portable concrete mixers? Achieve On-Site Mixing Flexibility & Control
- How much does a portable concrete mixer hold? A Guide to Choosing the Right Capacity
- What are the options for mixing concrete at small construction sites? Choose the Best Method for Your Project


