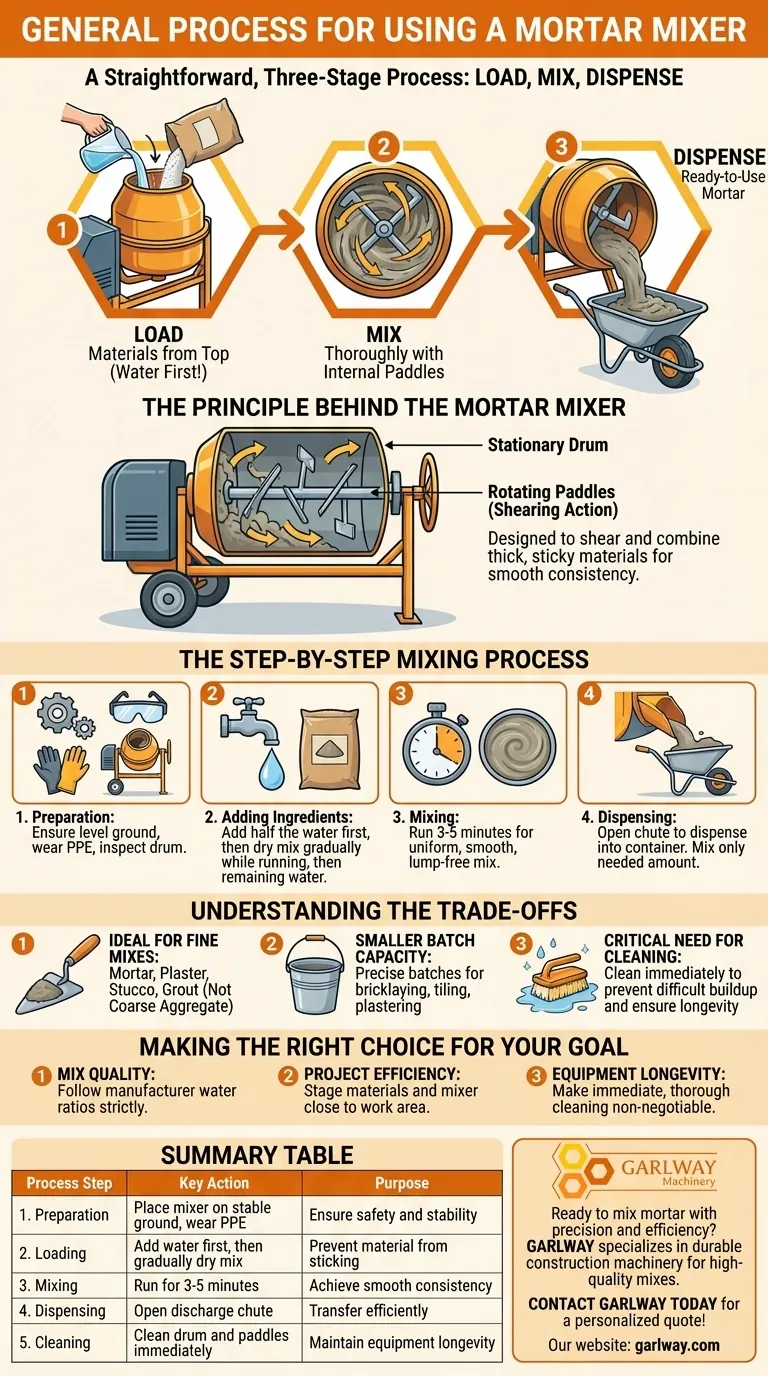
Using a mortar mixer is a straightforward, three-stage process. You begin by loading your dry materials and the specified amount of water from the top into the stationary drum. The machine's internal paddles then rotate to thoroughly combine the ingredients, scraping the sides to ensure a uniform consistency. Finally, you dispense the ready-to-use mortar from a discharge opening at the bottom of the tank.
A mortar mixer isn't just a smaller version of a concrete mixer. Its stationary drum and rotating paddles are specifically engineered to shear and combine thick, sticky materials, ensuring a smooth, consistent mix that a standard tumbling-drum mixer cannot achieve.
The Principle Behind the Mortar Mixer
Stationary Drum, Rotating Paddles
Unlike a concrete mixer that tumbles materials in a rotating drum, a mortar mixer has a stationary drum. Inside, a central shaft with several attached paddles rotates horizontally.
This design is intentional and highly effective. As the paddles spin, they slice through the mixture and scrape material from the sides and bottom of the drum, forcing everything to be continuously incorporated.
Why This Design Is Critical for Mortar
Mortar, stucco, and grout are sticky and tend to clump. A tumbling action would allow these materials to stick to the sides or form dry pockets.
The shearing action of the paddles is essential for breaking up clumps and ensuring every grain of sand and cement is properly hydrated. This produces the smooth, fine, and consistent mixture required for quality masonry and finishing work.
The Step-by-Step Mixing Process
Step 1: Preparation and Safety
Before you begin, ensure the mixer is on level, stable ground. Always wear appropriate personal protective equipment (PPE), including safety glasses and gloves. Inspect the mixer to ensure the drum and paddles are clean and in good working order.
Step 2: Adding the Ingredients
For the best results, avoid putting all the dry mix in first. Start by adding about half of the required water to the drum.
Turn the mixer on, and then gradually add your dry mortar mix. This prevents the powder from sticking to the bottom of the drum. Add the remaining water slowly until you reach the desired consistency as specified by the material's manufacturer.
Step 3: Mixing to Consistency
Allow the machine to run for 3-5 minutes. The goal is a uniform, workable mix with no dry spots or watery sections. The final texture should be smooth and consistent throughout the batch.
Step 4: Dispensing the Mortar
Once mixed, position a wheelbarrow or mortar tub under the discharge chute. Open the chute to dispense the material. Only mix as much mortar as you can use within its specified working time to avoid waste.
Understanding the Trade-offs
Ideal for Fine Mixes, Not Coarse Aggregate
Mortar mixers are purpose-built for materials like mortar, plaster, stucco, and grout. Their design is not suited for mixing concrete that contains large stones or coarse aggregate, as the paddles can be damaged or fail to properly mix the larger components.
Smaller Batch Capacity
Typically, mortar mixers have a smaller capacity than their concrete-mixing counterparts. They are designed for the more precise, often smaller batches required for bricklaying, tiling, or plastering jobs.
The Critical Need for Cleaning
The very efficiency that makes a mortar mixer great for sticky materials also makes it prone to buildup. Hardened mortar is extremely difficult to remove. Thorough cleaning of the drum and paddles immediately after each use is essential for reliability and maintainability.
Making the Right Choice for Your Goal
To get the most out of the equipment, align your process with your primary objective.
- If your primary focus is mix quality: Strictly adhere to the water-to-mix ratios provided by the material manufacturer to ensure proper strength and workability.
- If your primary focus is project efficiency: Stage your materials near the mixer and position the mixer close to your work area to minimize transit time.
- If your primary focus is equipment longevity: Make immediate and thorough cleaning a non-negotiable step at the end of every work session.
By understanding the specific design and process of a mortar mixer, you can confidently create the perfect batch for any masonry or finishing project.
Summary Table:
| Process Step | Key Action | Purpose |
|---|---|---|
| 1. Preparation | Place mixer on stable ground, wear PPE. | Ensure safety and machine stability. |
| 2. Loading | Add water first, then gradually add dry mix. | Prevent material from sticking to the drum. |
| 3. Mixing | Run for 3-5 minutes until uniform. | Achieve a smooth, lump-free consistency. |
| 4. Dispensing | Open discharge chute into a tub or wheelbarrow. | Transfer ready-to-use mortar efficiently. |
| 5. Cleaning | Clean drum and paddles immediately after use. | Maintain equipment and ensure longevity. |
Ready to mix mortar with precision and efficiency?
GARLWAY specializes in durable construction machinery, offering reliable mortar mixers designed for the demanding needs of construction companies and contractors. Our equipment helps you achieve consistent, high-quality mixes for masonry, plastering, and tiling projects, boosting on-site productivity.
Contact GARLWAY today to find the perfect mortar mixer for your business and get a personalized quote!
Visual Guide
Related Products
- JDY350 Electric Hydraulic Mortar Mud Concrete Mixer
- JDC350 Small Cement Concrete Mortar Mixer
- Mini Cement Mortar Mixer Truck for Construction
- Belle Mixer Drum Self Loading Mortar Mixers JS3000
- JS1000 Volumetric Concrete Mortar Mixer for Sale Skid Steer Cement Mixer
People Also Ask
- What types of projects typically use mortar mixers? Ensure Structural Integrity and Flawless Finishes
- What are the benefits of electric concrete mixers? Quiet, Clean, and Low-Maintenance Mixing
- What kind of oil do you put in a mortar mixer? The Right Choice for Engine Protection
- How are mortar mixers utilized in concrete and grout projects? Maximize Your Mixing Efficiency
- What is a mortar mixer and what is its primary use? Master Masonry with the Right Equipment


