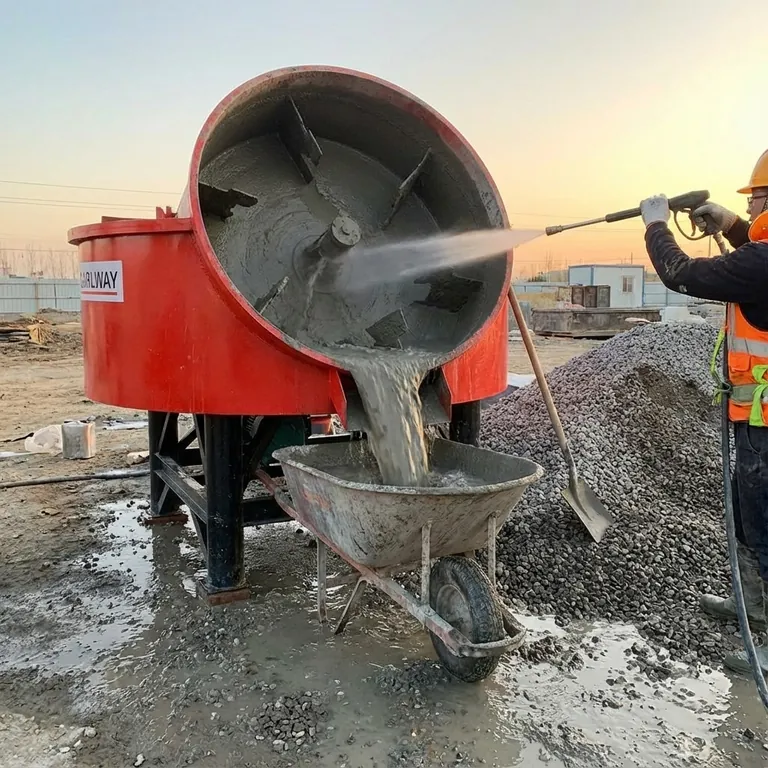
To remove mixed cement from a mixer, you must first tilt the rotating drum to carefully pour the mixture into a wheelbarrow or mold. Once the drum is empty, you must immediately clean it with water before the residual cement has any chance to harden, as this is critical for maintaining the equipment.
The process isn't just about emptying the concrete; it's a two-stage operation. The first stage is the controlled pour, and the equally critical second stage is the immediate cleaning to prevent permanent damage to your mixer.
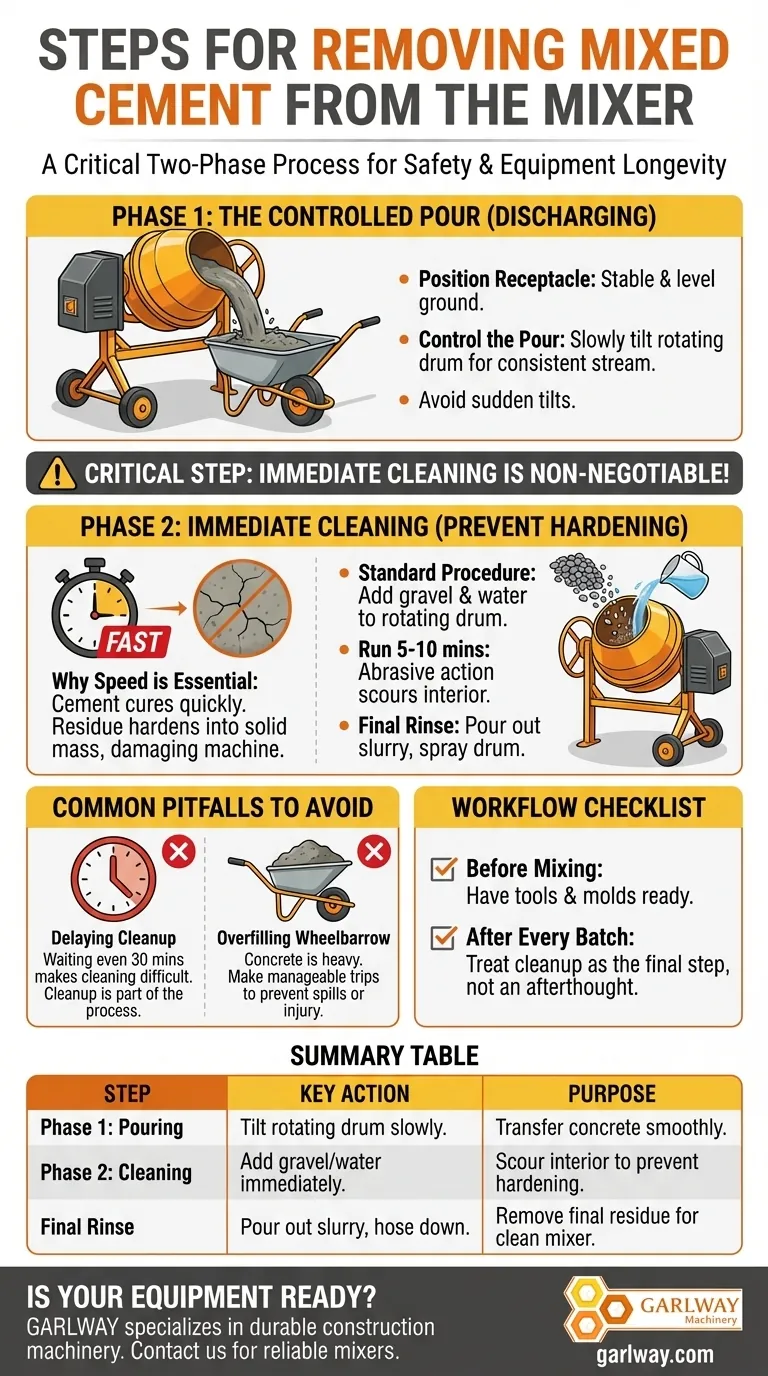
The Two-Phase Process: Pouring and Cleaning
Successfully emptying a cement mixer is a straightforward task, but it requires careful execution and immediate follow-through. The entire process can be broken down into discharging the wet concrete and then thoroughly cleaning the drum.
Phase 1: Discharging the Wet Concrete
This is the primary goal of your mix. The objective is to transfer the concrete from the drum to its destination—typically a wheelbarrow or prepared forms—without spills or separation of the aggregate.
Positioning Your Receptacle
Before you begin to tilt the drum, position your wheelbarrow or mold directly under the drum's opening. Ensure it is stable and on level ground to prevent it from tipping over under the weight of the concrete.
Controlling the Pour
Slowly and carefully tilt the drum while it is still rotating. This motion will guide the concrete out in a consistent stream. Avoid a sudden, sharp tilt, which can cause the heavy mixture to rush out uncontrollably.
The Critical Step: Immediate Cleaning
This step is non-negotiable for anyone who wants to use their mixer more than once. The moment the last of the usable concrete is out, the cleanup process must begin.
Why Speed is Essential
Cement begins the chemical process of hardening, or curing, as soon as water is added. Any residue left inside the drum will quickly harden into a solid mass that is extremely difficult, and sometimes impossible, to remove without damaging the machine.
The Standard Cleaning Procedure
The most effective method is to add a few shovels of coarse gravel or stone and several gallons of water to the empty, still-rotating drum. Let the mixer run for 5-10 minutes; the abrasive action of the gravel and water will scour the interior surfaces clean.
Final Rinse
Carefully tilt the drum to pour out the grey, watery slurry in an area where it will not cause damage. If needed, use a hose to spray down the interior and exterior of the drum to remove any final residue.
Common Pitfalls to Avoid
Mistakes in this process almost always relate to timing and preparation. Understanding these common errors can save you significant time and protect your equipment.
Delaying the Cleanup
This is the most common and costly mistake. Waiting even 30 minutes can allow the cement to set enough to make cleaning vastly more difficult. Cleaning should be considered part of the mixing process, not an afterthought.
Overfilling the Wheelbarrow
Concrete is incredibly heavy. Be realistic about how much you can safely transport in a wheelbarrow. It is far better to make two manageable trips than to risk one overloaded trip that could result in a spill or injury.
A Checklist for Your Workflow
Use these points to ensure your project is efficient and your equipment remains in top condition.
- If your primary focus is a smooth, continuous pour: Have your wheelbarrow, molds, and tools ready and in position before you finish mixing.
- If your primary focus is equipment longevity: Treat the cleanup as the final step of every single batch, never as something to be done at the end of the day.
Properly emptying and cleaning your mixer after every use is the single best way to ensure it's ready for your next project.
Summary Table:
| Step | Key Action | Purpose |
|---|---|---|
| Phase 1: Pouring | Tilt rotating drum slowly over a stable wheelbarrow/mold. | Transfer concrete smoothly without spills or separation. |
| Phase 2: Cleaning | Add gravel/stone and water to the empty, rotating drum immediately after pouring. | Scour the drum interior to prevent cement from hardening. |
| Final Rinse | Pour out slurry and hose down the drum. | Remove any final residue for a completely clean mixer. |
Is your equipment ready for the next project? Proper maintenance is key to productivity. GARLWAY specializes in durable construction machinery, including concrete mixers, winches, and batching plants designed for the demanding needs of construction companies and contractors. Contact our experts today to find a reliable mixer that simplifies your workflow and stands up to tough jobs.
Visual Guide
Related Products
- Portable Concrete Mixer Machine Equipment for Mixing Concrete
- Construction Products Concrete Plant Machine Mixing Concrete Mixer
- Portable Electric Concrete Mixer Machine for Cement Mixing
- JZC400 Mobile Small Concrete Mixer Cement Mixer Machine
- Hydraulic Concrete Mixer Machine Cement Mixing Equipment for Mixture Concrete
People Also Ask
- What are the advantages of a portable concrete mixer? Boost Efficiency & Save Costs on Small Jobs
- How much concrete can you pour with a portable mixer? Find the Perfect Fit for Your Project
- What types of projects are portable concrete mixers suitable for? Ideal for DIY & Small-Scale Construction
- What is the capacity of a typical portable concrete mixer? The 140L Standard for Small-Scale Projects
- What are the benefits of portable concrete mixers? Achieve On-Site Mixing Flexibility & Control


